
Oh my goodness, let me tell you about Hawaiian Cheesecake Salad! This delightful dish has become a staple in my kitchen, especially during those warm, sun-filled summer days when the idea of turning on the oven feels like a bad joke. I still remember the first time I tried it at a family barbecue; it was like a party in my mouth! The creamy, dreamy goodness combined with fresh, juicy fruits just screams “celebration,” doesn’t it? It’s a no-bake dessert salad that feels indulgent yet so refreshing.
This Hawaiian Cheesecake Salad is perfect for any occasion—be it a fun picnic, a potluck with friends, or even just a sweet treat to enjoy while lounging on the patio. Trust me, it’s not just a dessert; it’s an experience. The combination of cream cheese and fruit creates such a delightful contrast of flavors and textures that you’ll find yourself going back for seconds (or thirds!). Plus, with minimal prep time, it’s super easy to whip up, leaving you more time to relax and enjoy the sunshine. So grab your mixing bowls, and let’s dive into this tropical delight!
Why You’ll Love Hawaiian Cheesecake Salad
Oh, where do I even start with the reasons to love this Hawaiian Cheesecake Salad? First off, the flavors are absolutely out of this world! The sweet creaminess of the cheesecake base pairs perfectly with the tangy fruits, creating a burst of tropical goodness in every bite. It’s like a mini vacation on your plate!
But it doesn’t stop there. This salad is ridiculously easy to make. With just a handful of ingredients and no baking required, you can have this beauty ready in no time. It’s also incredibly versatile—feel free to swap in your favorite fruits or even add a little crunch with some nuts. Plus, it makes for a stunning centerpiece at summer gatherings, barbecues, or birthday parties. Honestly, everyone will be asking for the recipe, and you’ll be the star of the show!
Ingredients You’ll Need
Alright, let’s gather our ingredients for this vibrant Hawaiian Cheesecake Salad! You’ll need the following:
- 8 oz cream cheese, softened: Make sure it’s softened to room temperature; this helps achieve that silky-smooth texture we all love.
- 1 (8 oz) container whipped topping, thawed: I usually grab the extra creamy kind; it adds a lightness that’s just divine.
- 1/4 cup powdered sugar: This sweetens things up just right without being too overwhelming.
- 1 tsp vanilla extract: Pure vanilla is best if you have it—it elevates the flavors so beautifully!
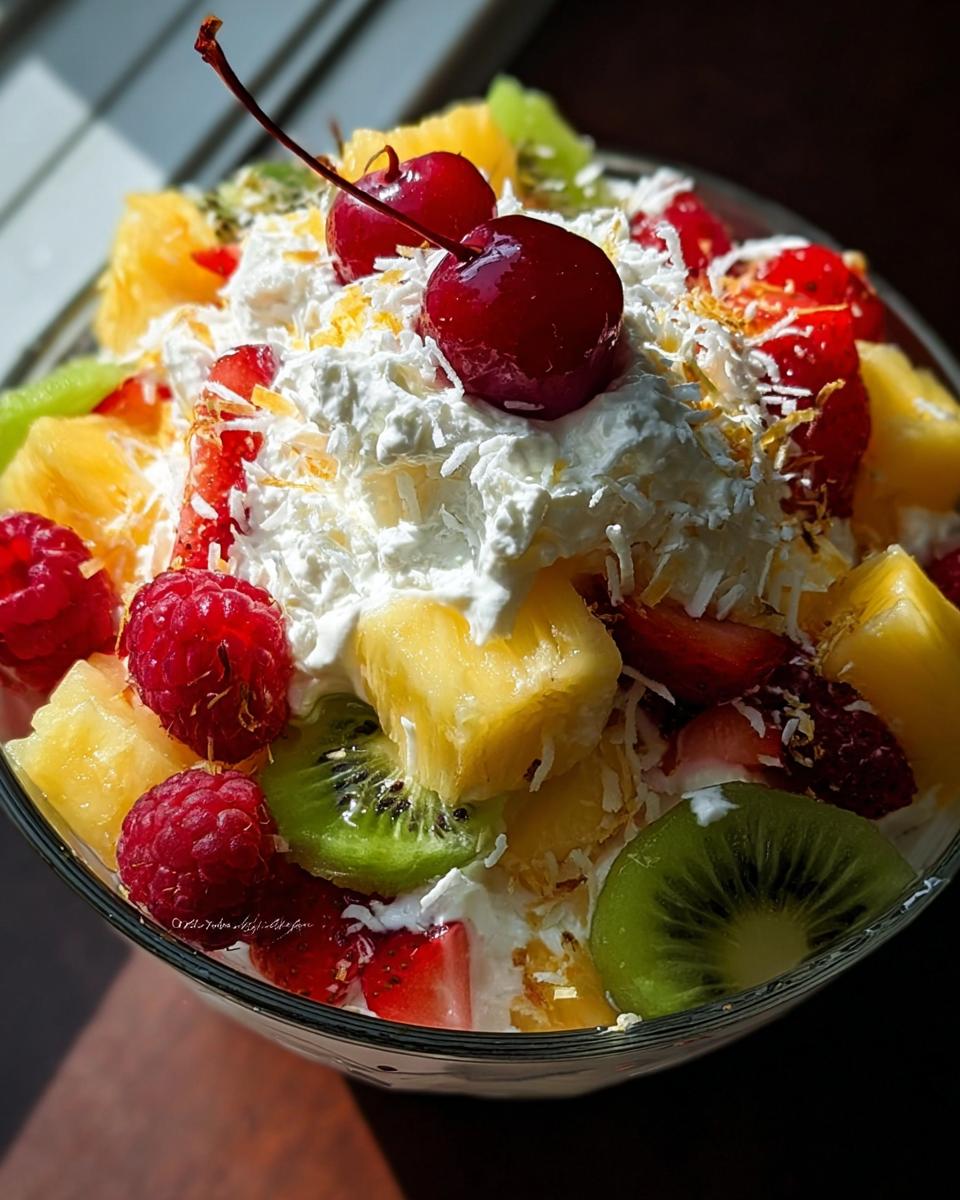
- 2 cups fresh strawberries, hulled and halved: Fresh strawberries bring sweetness and a pop of color; they’re a must!
- 1 cup fresh pineapple chunks: If using canned, be sure to drain it well. Fresh pineapple gives that juicy, tropical zing!
- 2 kiwi, peeled and sliced: Kiwi adds a lovely tartness and a vibrant green contrast.
- 1 cup raspberries: Oh, those juicy little gems just burst with flavor; they’re a perfect addition!
- 1/2 cup sweetened shredded coconut, lightly toasted (optional): This optional ingredient adds a delightful crunch and a hint of nuttiness—totally worth it if you ask me!
Cream Cheese and Whipped Topping
Now, let’s chat about the cream cheese and whipped topping. Using softened cream cheese is crucial for achieving that dreamy texture. If it’s cold, you’ll end up with lumps, and nobody wants that! Just leave it out for about 30 minutes before you start mixing. As for the whipped topping, it should be thawed, too. This makes it super light and fluffy, which complements the creaminess of the cheese. Together, they create a velvety base that just melts in your mouth. Trust me, this is where the magic happens!
Fresh Fruits
When it comes to fresh fruits, the choices are what really set this salad apart! Strawberries, pineapple, kiwi, and raspberries work together beautifully to bring a sweet-tart balance that dances on your taste buds. Each fruit adds its own unique flavor and texture—strawberries are juicy and sweet, pineapple is tropical and tangy, kiwi gives a refreshing zip, and raspberries are just bursting with juiciness! I always opt for fresh fruits whenever possible; they not only taste better, but they also make the salad look so vibrant and inviting. You can mix and match based on what’s in season or what you have on hand!
Optional Coconut
Ah, the optional toasted coconut! If you’re feeling adventurous, I highly recommend adding it. When lightly toasted, coconut brings a lovely crunch and a nutty flavor that beautifully complements the creamy base and fresh fruits. It’s like a little tropical surprise in every bite! Just toss it in a dry skillet over medium heat for a few minutes until golden and fragrant, and you’ll be in coconut heaven. Plus, it adds that extra touch of flair when serving—everyone will be asking, “What’s that delicious crunch?”
Step-by-Step Instructions
Now that we’ve gathered all our ingredients, it’s time to make this luscious Hawaiian Cheesecake Salad! Trust me, the steps are super simple, and you’ll have it ready in no time.
Preparing the Cream Cheese Mixture
First things first, grab your large mixing bowl and toss in the softened cream cheese. Using a hand mixer or a whisk, beat the cream cheese until it’s smooth and creamy—about 2 minutes should do the trick. You want it to be really fluffy, so don’t rush this step! Once it’s nice and smooth, add in the thawed whipped topping, powdered sugar, and vanilla extract. Mix it all together until everything is well combined and you have a light, airy mixture that just sings with flavor. Honestly, at this point, I could just eat it with a spoon!
Folding in the Fruits
Next up, it’s time to introduce the fruits! Gently fold in the strawberries, pineapple, kiwi, raspberries, and toasted coconut (if you’re using it) into your cream cheese mixture. Now, here’s the key: use a spatula and fold carefully! You want to combine everything without crushing the fruits. Just scoop from the bottom and lift the mixture over itself until it’s all blended. That way, you keep those beautiful chunks of fruit intact, and every bite remains a delightful surprise!
Chilling and Serving
Once everything is mixed to perfection, transfer your salad to a serving bowl or individual cups. Cover it with plastic wrap and pop it in the fridge for at least 30 minutes. Chilling is crucial because it allows the flavors to meld together and the salad to firm up a bit. Trust me, the wait is totally worth it! When you’re ready to serve, scoop it out into bowls, and if you want to get fancy, sprinkle some extra toasted coconut on top for that gorgeous presentation. You can even add a mint leaf for a pop of color! Now, gather your friends and family around because this salad is about to steal the show!
Variations
The beauty of Hawaiian Cheesecake Salad lies in its versatility! You can totally mix it up based on your taste or what you have on hand. For example, if you’re in the mood for something a little different, try swapping in some mango chunks or blueberries for a tropical twist. Berries and peaches are also fantastic additions when they’re in season! You can find great salad recipes here.
If you’re looking for a bit of crunch, consider tossing in some chopped nuts like pecans or macadamia nuts. They add a lovely texture contrast and a nutty flavor that pairs perfectly with the creamy base. You could even experiment with adding a splash of lime juice for an extra zing! The options are endless, so feel free to get creative and make this salad your own!
Serving and Storage Tips
When it comes to serving your Hawaiian Cheesecake Salad, the options are endless! You can serve it in a large bowl for a casual gathering, or for a more elegant touch, scoop it into individual dessert cups. I love garnishing each serving with a sprinkle of toasted coconut and a fresh mint leaf to really make it pop! This salad is best enjoyed chilled, so keep it in the fridge until you’re ready to dig in.
As for storage, you can keep any leftovers in an airtight container in the refrigerator for up to three days. The flavors will continue to meld, making it even more delicious on the second day! Just be sure to give it a gentle stir before serving again. If you’re planning to make this ahead of time, it holds up beautifully, so you can whip it up a few hours in advance without any worries. Just remember, it’s too tasty to last long, so enjoy it while it’s fresh!
Helpful Notes
Using fresh fruits in your Hawaiian Cheesecake Salad is a game-changer! They not only enhance the flavor but also bring vibrant colors and textures that make the dish so appealing. Fresh fruits are packed with nutrients, and their natural sweetness means you can often use less added sugar, which is always a win in my book! For more information on the benefits of fresh fruit, check out USDA’s Fructose Overview.
If you’re planning for a party or just want to save some time, this salad can easily be made a few hours ahead of time. Just store it in the fridge until you’re ready to serve, and it’ll taste just as delicious! Plus, if you’re looking for some nutritional variations, you can swap out the cream cheese for a lower-fat option or even a dairy-free alternative. Just remember, the magic is in the freshness, so go for those ripe, juicy fruits whenever possible!
Frequently Asked Questions
1. Can I freeze this Hawaiian Cheesecake Salad?
While I wouldn’t recommend freezing it, you can store it in the fridge for up to three days. Freezing may change the texture of the cream cheese and fruits, making it a bit watery when thawed.
2. What if I don’t have fresh fruits?
If you can’t find fresh fruits, you can use frozen ones, just make sure to thaw and drain them well before mixing. Canned fruits work too—just be sure to choose those packed in juice or water to avoid excess syrup!
3. Can I make this salad vegan?
Absolutely! You can substitute the cream cheese with a vegan cream cheese alternative and use coconut whipped cream instead of the whipped topping. This way, you can enjoy the tropical flavors while keeping it plant-based!
4. Is there a gluten-free option?
Yes! This Hawaiian Cheesecake Salad is naturally gluten-free as long as you ensure that your whipped topping and any additional ingredients you use are gluten-free. It’s a great dessert for everyone!
5. How can I make it less sweet?
If you prefer a less sweet salad, simply reduce the amount of powdered sugar or use a sugar substitute. You can also add more tart fruits like kiwi and raspberries to balance the sweetness!
Final Thoughts
So there you have it—my beloved Hawaiian Cheesecake Salad! I can’t wait for you to try making it yourself. It’s such a fun, refreshing dessert that brings a bit of tropical sunshine to any occasion. Trust me, once you take that first bite, you’ll be hooked! I’d love to hear how yours turns out, so don’t hesitate to share your experiences, tweaks, and maybe even some photos! Happy cooking, and enjoy every delicious spoonful! For more dessert inspiration, check out our dessert recipes.
Print
Hawaiian Cheesecake Salad
- Total Time: 45 minutes
- Yield: 6 servings 1x
- Diet: Vegetarian
Description
A refreshing dessert salad that combines the flavors of cheesecake with fresh fruits.
Ingredients
- 8 oz cream cheese, softened
- 1 (8 oz) container whipped topping, thawed
- 1/4 cup powdered sugar
- 1 tsp vanilla extract
- 2 cups fresh strawberries, hulled and halved
- 1 cup fresh pineapple chunks, drained if using canned
- 2 kiwi, peeled and sliced
- 1 cup raspberries
- 1/2 cup sweetened shredded coconut, lightly toasted (optional)
Instructions
- In a large bowl, beat the cream cheese until smooth.
- Add the whipped topping, powdered sugar, and vanilla extract. Mix until well combined.
- Gently fold in the strawberries, pineapple, kiwi, raspberries, and coconut if using.
- Chill the mixture in the refrigerator for at least 30 minutes before serving.
- Serve in individual bowls or a large serving dish.
Notes
- For best flavor, use fresh fruits.
- Can be made a few hours in advance.
- Prep Time: 15 minutes
- Cook Time: 0 minutes
- Category: Dessert
- Method: No-bake
- Cuisine: Hawaiian
Nutrition
- Serving Size: 1 cup
- Calories: 250
- Sugar: 20g
- Sodium: 150mg
- Fat: 10g
- Saturated Fat: 5g
- Unsaturated Fat: 3g
- Trans Fat: 0g
- Carbohydrates: 35g
- Fiber: 3g
- Protein: 4g
- Cholesterol: 30mg
Keywords: Hawaiian Cheesecake Salad, dessert salad, fruit salad
