
Oh boy, do I have a treat for you today! Let me introduce you to my absolute favorite dessert, Cherries in the Snow. This delightful creation always brings back fond memories of summer barbecues and family gatherings when my grandma would whip it up. I can still hear her laughter as we eagerly waited for it to chill in the fridge. The combination of creamy goodness and sweet cherries is simply unbeatable!
What I love most about Cherries in the Snow is how effortlessly it comes together. There’s no baking involved, which means you can focus on the fun part—enjoying the process! It’s perfect for any occasion, whether it’s a picnic, a potluck, or just a sweet treat to brighten up your day. Plus, it’s a make-ahead dessert, so you can prepare it in advance and impress your friends and family without the last-minute rush. Trust me, once you taste this dessert, you’ll want to make it a staple in your kitchen!

Why You’ll Love “Cherries in the Snow”
Let me tell you why Cherries in the Snow is a dessert you absolutely need in your life! First off, the creamy texture is like a cloud of deliciousness melting in your mouth. I mean, who doesn’t love that dreamy combination of cream cheese and whipped topping? It’s rich and satisfying without feeling heavy, making it perfect for warm weather gatherings.
And then there’s the burst of fruity flavor from the cherry pie filling. The sweet, tangy cherries complement the creamy base beautifully, creating a delightful balance that keeps you coming back for more. Plus, it’s a no-bake dessert, which means you don’t have to turn on the oven or sweat it out in the kitchen. Just mix, layer, and chill!
Cherries in the Snow is also a showstopper for parties. Its vibrant colors and beautiful layers make it a feast for the eyes, and trust me, everyone will be asking for the recipe. Whether you’re celebrating a holiday, hosting a barbecue, or simply treating yourself, this dessert is sure to impress and leave everyone wanting seconds!
Ingredients You’ll Need
To make Cherries in the Snow, you’ll need just a handful of simple ingredients that come together beautifully. Here’s what you’ll need:
- 12 oz block-style cream cheese, room temperature – This is the star of the show! Room temperature cream cheese mixes in smoothly, creating that dreamy texture we all love.
- ¾ cup powdered sugar, sifted – Sifting the powdered sugar helps avoid any lumps, ensuring your cream cheese mixture is silky and sweet.
- ⅓ cup whole milk – This adds just the right amount of creaminess to your dessert. You can also use low-fat milk if you want, but whole milk really makes it rich!
- ½ tsp vanilla extract – A splash of vanilla adds depth and enhances the flavors. Trust me, you’ll want this in there!
- 8 oz whipped topping, thawed – This gives our dessert that light, airy quality. Use the good stuff for the best results.
- 1 pre-baked angel food cake, torn into ¾–1 inch pieces – This is the base of our layers, contributing texture and sweetness. Store-bought is totally fine, but if you’re feeling adventurous, homemade is even better!
- 2 (21 oz each) cans cherry pie filling – You can’t have Cherries in the Snow without cherries! I love the convenience of canned, but if you can get fresh cherries when they’re in season, go for it!
Cream Cheese and Sugar
Using room temperature cream cheese is crucial for this recipe. It allows you to mix it into a smooth, creamy base without any lumps. If you forget to take it out of the fridge ahead of time, just pop it in the microwave for about 10 seconds to soften it up. And don’t skip sifting the powdered sugar! This ensures your mixture is super smooth and avoids any gritty texture in your dessert.
Cherry Pie Filling
When it comes to cherry pie filling, you’ve got options! Canned cherry pie filling is a quick and easy choice, and it tastes great. However, if you happen to have fresh cherries on hand, I highly recommend using them instead. Fresh cherries add a vibrant flavor and a lovely pop of color that takes this dessert to the next level. Just pit and slice them, and you’ll have a wonderfully fresh twist!
Other Key Ingredients
Now, let’s talk about the other ingredients. The whole milk is essential for achieving that creamy consistency that makes this dessert so luscious. And a little vanilla extract goes a long way in enhancing the overall flavor. The whipped topping adds that lightness we’re looking for, making each bite feel like a fluffy cloud. Lastly, the angel food cake acts as the perfect sponge, soaking up the flavors while providing a lovely texture. It’s all about balance and harmony here!
Step-by-Step Instructions
Now that you’ve gathered your ingredients, let’s dive into the delicious process of making Cherries in the Snow! It’s super simple, and I promise you’ll be enjoying this creamy, fruity dessert in no time.
Preparing the Cream Cheese Mixture
First things first, grab a large mixing bowl and beat that room temperature cream cheese until it’s nice and smooth. You can use a hand mixer or a sturdy spatula if you’re feeling a bit old-school. Once it’s creamy, gradually add in the sifted powdered sugar. This is where things start to get really dreamy! Mix until everything is well-combined and there are no lumps left. You want it silky smooth, so don’t rush this step!
Folding in Whipped Topping
Next up, it’s time to fold in the whipped topping. This is where we keep that light and airy texture, so be gentle! Using a spatula, scoop under and lift the cream cheese mixture, folding it over the whipped topping. Do this until they’re just combined—don’t overdo it! You want to see swirls of white and creaminess, not a fully blended mass. It’s okay if there are a few streaks; it just adds to the charm!
Layering the Dessert
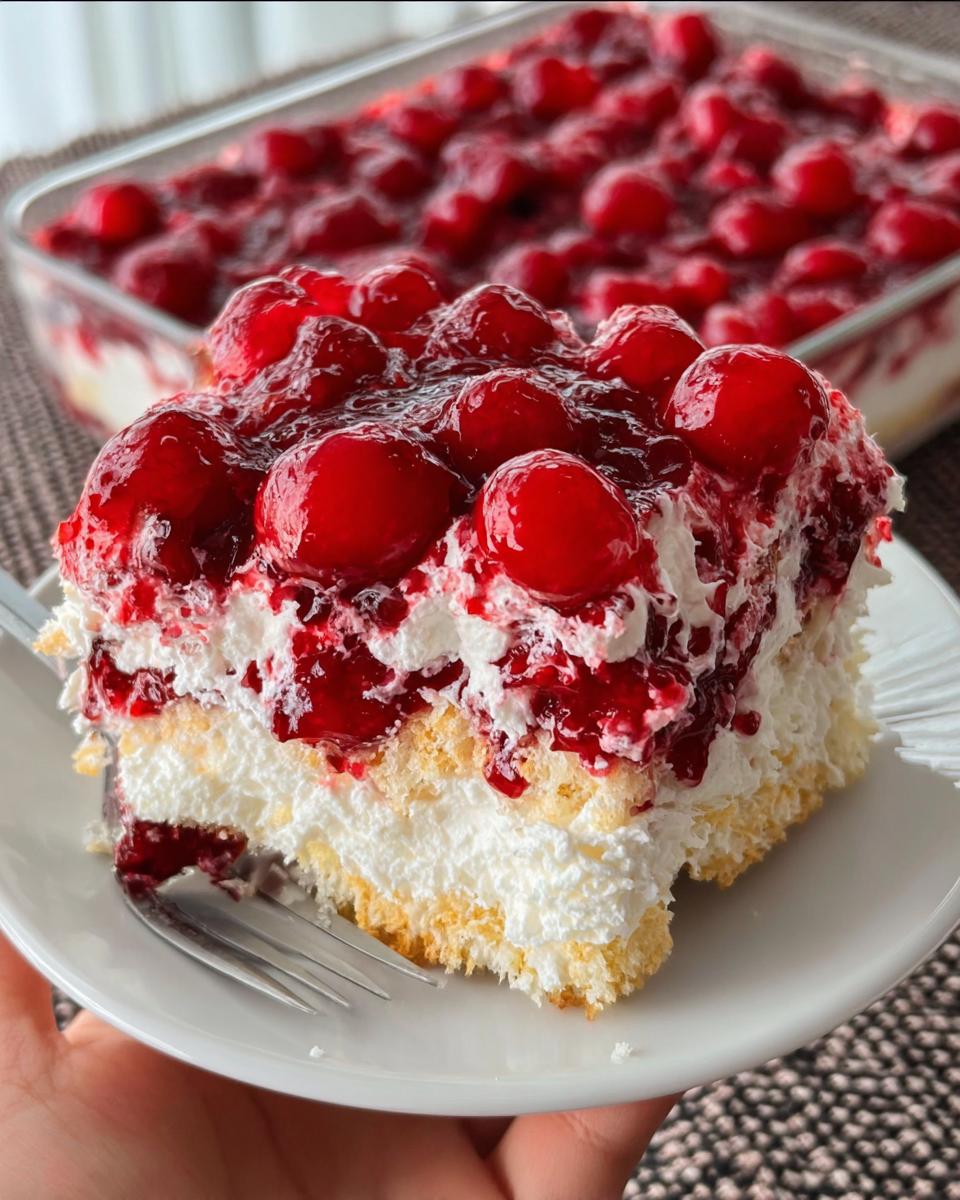
Now, let’s get to the fun part: layering! In a trifle dish or a large bowl, start by placing a layer of the torn angel food cake pieces at the bottom. Then, add a generous layer of the cream cheese mixture followed by a layer of cherry pie filling. Repeat this process until all your ingredients are used up, finishing with a beautiful layer of cherries on top. For a stunning presentation, try to alternate the layers so that you can see those gorgeous colors peeking through the clear sides of your dish. It’s like a work of art!
Chilling the Dessert
Once you’ve layered everything up, it’s time to let it chill in the fridge. Cover it with plastic wrap or a lid and let it sit for at least 2 hours. This chilling time is essential because it allows all those fabulous flavors to meld together and helps the dessert set up nicely. Trust me, the wait is worth it! After a couple of hours, you’ll have a dessert that’s refreshing, creamy, and oh-so-delicious.
Variations
One of the best things about Cherries in the Snow is how easy it is to customize! If you’re feeling adventurous, why not swap out the cherry pie filling for other fruits? Fresh strawberries or blueberries can create a delightful berry version that’s just as creamy and delicious. You could even mix a few different fruits for a colorful medley!
If you want to take a walk on the wild side, try adding a splash of almond extract instead of vanilla for an extra layer of flavor. It pairs beautifully with the cherries and gives a lovely nutty undertone. For a chocolate twist, sprinkle some mini chocolate chips between the layers or drizzle chocolate sauce over the top before serving. Yum!
And if you’re looking for a lighter version, you can use reduced-fat cream cheese and whipped topping. Just keep in mind that the texture might be a little different, but it’ll still taste fantastic. Plus, you could even try a gluten-free angel food cake if you need to accommodate any dietary restrictions. The possibilities are endless, so have fun experimenting with your own flavor combinations!
Serving and Storage Tips
When it comes to serving Cherries in the Snow, presentation is key! I love using a clear trifle dish to really showcase those beautiful layers. You can also serve it in individual cups or bowls for a more personal touch—perfect for parties or gatherings. Just make sure to give it a good scoop to get all those lovely layers in each serving!
For storage, keep any leftovers covered in the fridge. It’ll last for about 3-4 days, but trust me, it’s usually gone long before then! If you’re planning to make it ahead of time, feel free to prepare it a day in advance. Just remember to cover it well to keep it fresh. I don’t recommend freezing it, as the texture can change once it’s thawed. Enjoy it chilled for the best experience!
Helpful Notes
Here are a few extra tips to help you nail Cherries in the Snow every time! First off, if you want to make this dessert a day in advance, go for it! In fact, it tastes even better after sitting overnight, allowing those flavors to meld beautifully. Just make sure to cover it well in the fridge to keep it fresh.
As for nutritional considerations, this dessert does pack a bit of sweetness, so if you’re trying to cut down on sugar, you can use a sugar substitute in the cream cheese mixture. Just be sure to check the packaging for any conversions and adjust accordingly. And if you need it to be gluten-free, just grab a gluten-free angel food cake—there are options out there that are just as light and fluffy!
Lastly, don’t hesitate to get creative with the toppings! A sprinkle of shredded coconut, a drizzle of chocolate sauce, or some crushed nuts can take it to the next level. Enjoy your cherry-filled adventure!
Frequently Asked Questions
1. Can I freeze Cherries in the Snow?
Unfortunately, I don’t recommend freezing this dessert. The texture can change once thawed, and it may not be as creamy and delightful. It’s best enjoyed fresh or after chilling in the fridge.
2. What if I don’t have cherry pie filling?
No problem at all! If you can’t find cherry pie filling, you can easily use fresh or frozen cherries mixed with a little sugar and cornstarch to create your own filling. Just cook them down until bubbly and thick, and you’ll have a delicious alternative!
3. How long can I store leftovers?
You can store any leftovers in the fridge for about 3-4 days. Just make sure to cover it well to keep it fresh. I doubt it’ll last that long, though; it’s just too good!
4. Can I use a different type of cake?
Absolutely! While angel food cake is traditional, you can use pound cake or sponge cake if you prefer. Just keep in mind that it might change the texture a bit, but it’ll still be delicious!
5. What’s the best way to serve it?
For a stunning presentation, serve it in a clear trifle dish to showcase those beautiful layers. You can also dish it out into individual cups or bowls for a more personal touch at parties. Just make sure everyone gets a bit of each layer!
Final Thoughts
As you can see, Cherries in the Snow is more than just a dessert; it’s a celebration of flavors and memories! I truly hope you give this delightful treat a try. Whether you’re sharing it with family during a cozy dinner or bringing it to a lively gathering with friends, it’s bound to steal the show. And remember, the best part is watching everyone’s faces light up as they take that first bite!
I’d love to hear about your experiences making Cherries in the Snow. Did you try any fun variations? What did your loved ones think? Please share your stories and tips, because cooking is always better when we share our adventures together. Happy baking, and enjoy every creamy, cherry-filled bite!
Print
Cherries in the Snow
- Total Time: 2 hours 20 minutes
- Yield: 8 servings 1x
- Diet: Vegetarian
Description
A delicious dessert combining cream cheese, cherries, and angel food cake.
Ingredients
- 12 oz block-style cream cheese, room temperature
- ¾ cup powdered sugar, sifted
- ⅓ cup whole milk
- ½ tsp vanilla extract
- 8 oz whipped topping, thawed
- 1 pre-baked angel food cake, torn into ¾–1 inch pieces
- 2 (21 oz each) cans cherry pie filling
Instructions
- In a large bowl, beat cream cheese and powdered sugar until smooth.
- Add milk and vanilla extract, mixing until combined.
- Fold in whipped topping gently.
- In a trifle dish or large bowl, layer angel food cake pieces, cream cheese mixture, and cherry pie filling.
- Repeat layers until all ingredients are used, finishing with cherry pie filling on top.
- Chill in the refrigerator for at least 2 hours before serving.
Notes
- For best results, use fresh cherries when in season.
- Can be made a day in advance.
- Prep Time: 20 minutes
- Cook Time: 0 minutes
- Category: Dessert
- Method: No-bake
- Cuisine: American
Nutrition
- Serving Size: 1 serving
- Calories: 350
- Sugar: 25g
- Sodium: 150mg
- Fat: 15g
- Saturated Fat: 9g
- Unsaturated Fat: 4g
- Trans Fat: 0g
- Carbohydrates: 50g
- Fiber: 1g
- Protein: 5g
- Cholesterol: 30mg
Keywords: Cherries in the Snow, dessert, cherry pie, no-bake dessert
