
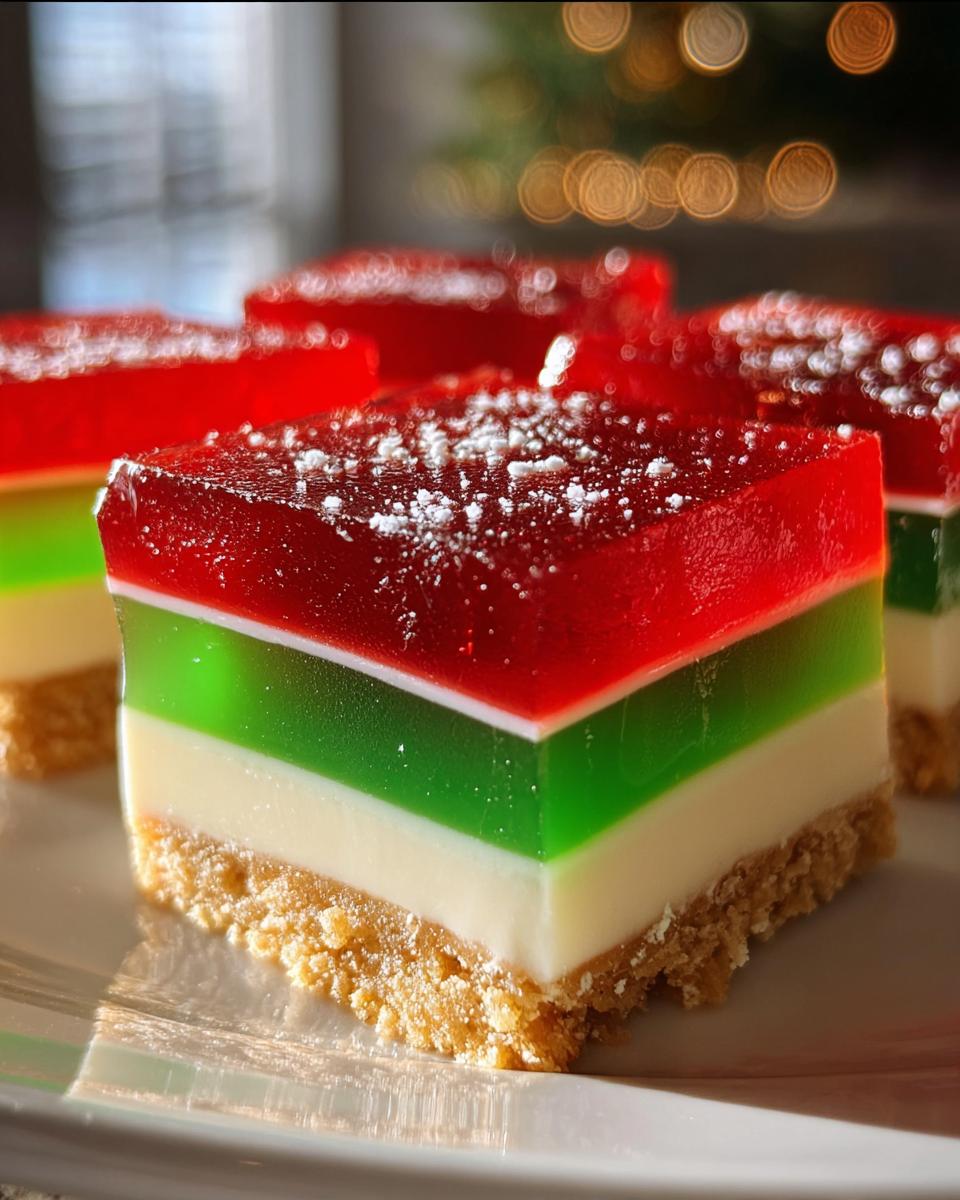
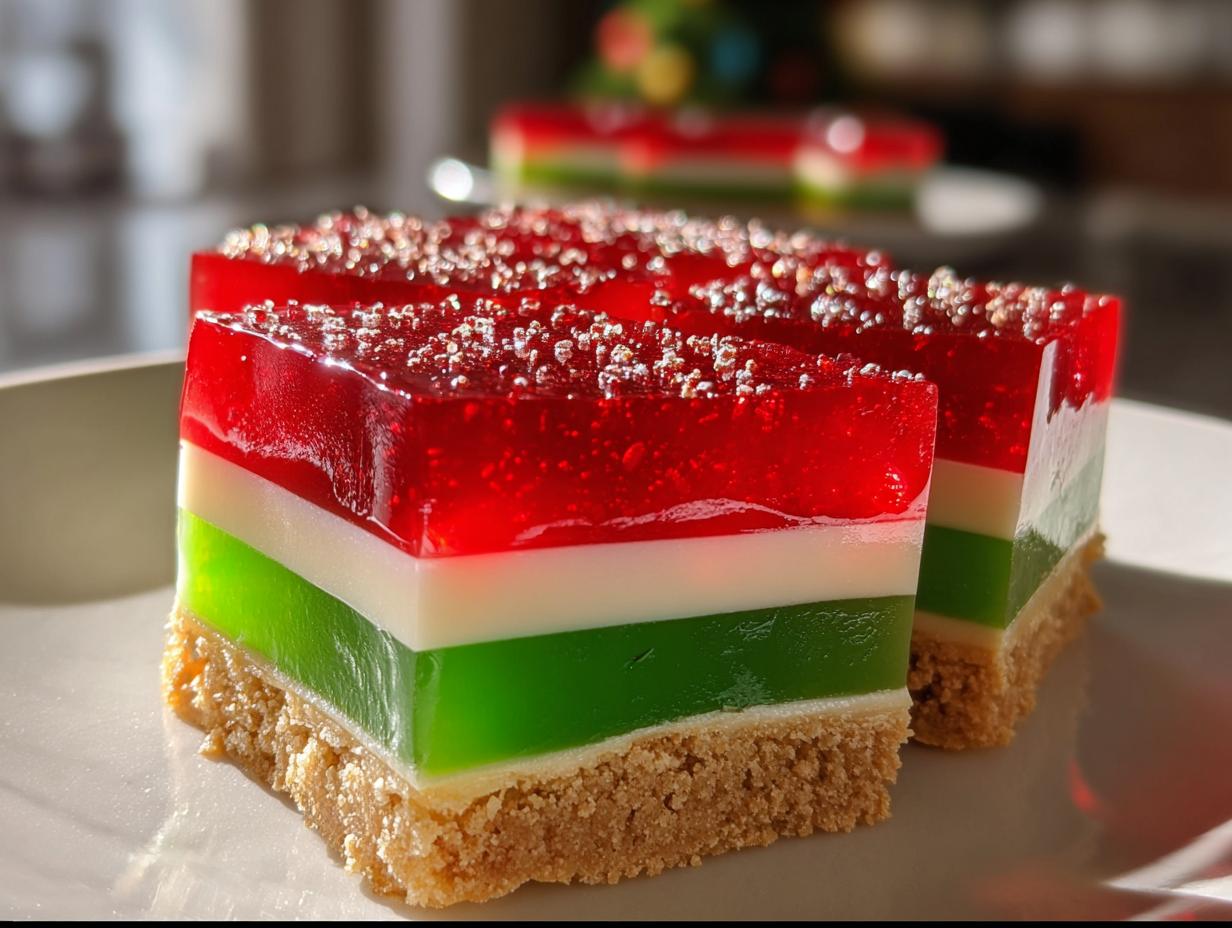
Oh wow, let me tell you about my absolute favorite holiday dessert: Green & Red Christmas Jelly! Growing up, my family always made this vibrant jelly for our Christmas gatherings, and it’s become a tradition that I cherish deeply. The sight of those luscious red and green layers just fills my heart with joy! It’s not just beautiful to look at; it’s a deliciously creamy and refreshing treat that perfectly balances the richness of the holiday season.
This dessert is a showstopper at any gathering, effortlessly bringing smiles to everyone’s faces. You know, there’s something magical about digging into those colorful layers, especially when they jiggle just right! Plus, it’s surprisingly easy to whip up, making it ideal for busy holiday schedules. So, if you’re looking to impress your guests or simply want to spread some festive cheer, this Green & Red Christmas Jelly is the way to go. Trust me, your holiday table won’t be complete without it!
Why You’ll Love Green & Red Christmas Jelly
Oh my goodness, where do I even start? First off, this Green & Red Christmas Jelly is absolutely stunning on any holiday table. The vibrant colors just scream festive cheer! But it’s not just about the looks; the texture is a delightful mix of creamy and jiggly, which makes each bite a total joy. You’ll get that rich, smooth layer of creamy goodness followed by the refreshing burst of fruity jelly. It’s like a party for your taste buds!
And let’s talk about ease of preparation! With just a handful of ingredients and a bit of chilling time, you can create this dazzling dessert. It’s perfect for those busy holiday days when you want something impressive but don’t have hours to spare in the kitchen. Plus, it’s a fun recipe to make with the kids, letting them help with the colorful layers. Trust me, everyone will be asking for seconds!
Ingredients You’ll Need
Alright, let’s gather our ingredients for this stunning Green & Red Christmas Jelly! Trust me, using quality ingredients makes all the difference in flavor and texture. Here’s what you’ll need:
- 250 g Arnott’s Marie or Nice biscuits, crushed: These biscuits form the delightful base of our jelly. They’re buttery and perfectly crumbly, which gives a lovely texture to the dessert. You can easily crush them in a food processor or just pop them in a zip-lock bag and give them a good whack with a rolling pin!
- 125 g unsalted butter, melted: This is the glue that holds our biscuit base together. Unsalted is best so we can control the sweetness of the dessert. Just melt it in the microwave or on the stovetop until it’s liquid gold!
- 1 × 395 g can sweetened condensed milk: This is the creamy star of our show! It adds a luscious sweetness and smoothness that perfectly balances the jelly layers. Make sure to pour it all out; it’s so good, you won’t want to waste a drop!
- 1 cup boiling water: We need this to dissolve the gelatine and to mix with our jelly crystals. Just boil the kettle and let it work its magic!
- ½ cup lemon juice: Freshly squeezed is always best! It adds a zesty brightness that cuts through the sweetness and enhances all the flavors. You’ll love the freshness it brings!
- 3 tsp gelatine: This is what helps our creamy layer set just right. If you’re using powdered gelatine, make sure to sprinkle it over the liquid and let it bloom before mixing.
- ¼ cup cold water: This is to help dissolve the gelatine too. Just have it ready to go!
- 1 packet (85 g) red jelly crystals (raspberry or strawberry flavour): These give us that beautiful red layer. Choose your favorite flavor for a personal twist!
- 1 packet (85 g) green jelly crystals (lime flavour): This gives the jelly its vibrant green color and a refreshing taste. Again, feel free to experiment with flavors!
- 2 cups boiling water (1 cup per jelly packet): We’ll need this to dissolve the jelly crystals. Boil up two cups so we’re ready to go!
- 2 cups cold water (1 cup per jelly packet): This will help to cool down the jelly mixture before we pour it over our layers!
So there you have it, all the ingredients you’ll need for this festive delight. Gather them up, and let’s get ready to create something magical!
Step-by-Step Instructions
Alright, let’s dive into the delicious process of making our Green & Red Christmas Jelly! Don’t worry, I’m here to guide you through each step, so grab your apron and let’s get started!
Preparing the Biscuit Base
First things first, we need to whip up that scrumptious biscuit base! In a large mixing bowl, combine your crushed Arnott’s Marie or Nice biscuits with the melted unsalted butter. Use a spatula to mix them together until it resembles damp sand. The butter will soak into those crumbs, making it just perfect!
Now, grab a lined baking dish (around 20cm x 30cm works well) and pour that biscuit mixture right in. Using the back of a spoon or even your hands (yes, get in there!), press it down firmly to create an even layer. You want it compact, so it holds together when we slice into it later. Pop this beauty into the fridge for about 15-20 minutes to set while we prepare the creamy layer!
Making the Creamy Layer
Now, let’s get that creamy layer going! In a bowl, mix together the sweetened condensed milk, boiling water, lemon juice, and gelatine. Here’s a little tip: first, sprinkle the gelatine over the cold water and let it sit for a minute or two to bloom. Then, warm it up gently in the microwave or on the stovetop until it’s fully dissolved. This helps it integrate smoothly into our mixture!
Once your gelatine is ready, pour it into the bowl with the other ingredients. Whisk it all together until it’s beautifully smooth and creamy. Don’t you just love that texture? Now it’s time to take our biscuit base out of the fridge! Pour that luscious creamy mixture over the biscuit base, smoothing it out with a spatula. It should be a nice even layer. Now, back into the fridge it goes! Let it chill for about 1-2 hours until it’s firmly set. Patience is key here, but trust me, it’ll be so worth it!
Setting the Jelly Layers
Okay, the creamy layer is set, and now we’re ready to add the colorful jelly layers! Start by preparing the red jelly. In a bowl, dissolve the red jelly crystals in 1 cup of boiling water. Give it a good stir until all those crystals are fully dissolved. Once that’s done, add in 1 cup of cold water to cool it down a bit. Let it sit for a few minutes to reach room temperature – we don’t want to pour hot jelly on our creamy layer and ruin all that hard work!
Once it’s cooled, carefully pour the red jelly over the set creamy layer. Make sure to pour it slowly so it doesn’t disturb the layers underneath. Back into the fridge it goes for another 1-2 hours, or until it’s fully set. Repeat the same process for the green jelly. Dissolve the green jelly crystals in 1 cup of boiling water, stir in 1 cup of cold water, and let it cool. Then gently pour it over the red jelly layer once it’s set. You’ll want to give it another good couple of hours in the fridge to set completely. Oh, the anticipation is real!
Once all the layers are set, you’ll be left with a stunning dessert that’s ready to impress! Just slice it up and serve chilled. You’re going to love how it looks and tastes!
Variations
Now, if you’re feeling a bit adventurous, there are so many fun variations you can try with your Green & Red Christmas Jelly! For a twist on the flavor, why not swap out the jelly crystals? You could use orange jelly for a citrusy touch or even a mixed berry flavor for a deliciously fruity alternative. Just imagine those colorful layers bursting with different flavors!
If you want to make it a bit more festive, consider adding a hint of peppermint extract to the creamy layer. It’ll give your jelly a refreshing holiday vibe! And for a gluten-free option, just switch the Arnott’s biscuits for gluten-free alternatives — there are plenty on the market that work just as well. The best part is, you can totally get creative with the colors and flavors to make your Christmas Jelly uniquely yours. Enjoy experimenting!
Serving and Storage Tips
Serving your Green & Red Christmas Jelly is half the fun! I love to slice it into squares and arrange them on a festive platter, maybe with some mint leaves for a pop of color. You could even drizzle a little chocolate sauce on top for an extra touch of decadence — yum!
As for storage, this beauty can last in the fridge for about 3-4 days, but I doubt it’ll stick around that long once you share it with family and friends! Just cover it with plastic wrap to keep it fresh. If you want to make it ahead of time, you can prepare it a day or two in advance. Just remember to store it in the fridge until you’re ready to serve. Trust me, it’s best enjoyed chilled, so keep that refrigerator nice and cozy for this festive treat!
Helpful Notes
Before you dive into making this delightful Green & Red Christmas Jelly, here are a few important notes to keep in mind. First, patience is key! Make sure each layer is fully set before adding the next to avoid any mixing or bleeding of colors. It’s well worth the wait for those stunning layers!
Using fresh lemon juice is a must; it elevates the flavor, adding a zesty brightness that beautifully complements the sweetness of the jelly. Trust me, you’ll taste the difference! And don’t forget to chill the dessert for several hours, or even overnight if you can. This will ensure the perfect texture for slicing and serving. Remember, the longer it chills, the better it gets! So, take your time, and let the magic happen in the fridge!
Frequently Asked Questions
1. Can I freeze this?
While I don’t recommend freezing the Green & Red Christmas Jelly, as it may alter the texture, you can prepare it a day in advance and store it in the fridge until serving. Trust me, it’s best enjoyed fresh!
2. What if I don’t have sweetened condensed milk?
If you can’t find sweetened condensed milk, you can make a homemade version by simmering milk and sugar together until thickened. Just keep an eye on it, and stir frequently to prevent burning!
3. Can I use different flavors of jelly?
Absolutely! Feel free to experiment with your favorite jelly flavors. Orange, mixed berry, or even tropical flavors like pineapple can bring a fun twist to the classic recipe!
4. How can I make this dairy-free?
If you want to make a dairy-free version, substitute the sweetened condensed milk with coconut cream or a dairy-free alternative. Just ensure you check the labels for any hidden ingredients!
5. What’s the best way to slice the jelly?
To get those perfect, clean slices, use a sharp knife and dip it in warm water before cutting. Wipe the knife between slices to keep the edges looking neat and tidy!
Final Thoughts
Making and sharing this Green & Red Christmas Jelly is truly one of the highlights of the holiday season for me. There’s something so special about gathering with loved ones, indulging in sweet treats, and creating memories that last a lifetime. This vibrant dessert not only brings festive cheer to the table but also invites everyone to enjoy the delightful textures and flavors in each bite.
I wholeheartedly encourage you to give this recipe a try! It’s a wonderful way to spread joy and deliciousness during the holidays. Whether it’s at family gatherings or cozy get-togethers with friends, this jelly is sure to be a showstopper. So, roll up your sleeves, get into the holiday spirit, and whip up this delightful treat. Trust me, you’ll be so glad you did!
Print
Green & Red Christmas Jelly
- Total Time: 4 hours
- Yield: 12 servings 1x
- Diet: Vegetarian
Description
This Green & Red Christmas Jelly is a festive dessert with a biscuit base, creamy middle, and vibrant jelly layers.
Ingredients
- 250 g Arnott’s Marie or Nice biscuits, crushed
- 125 g unsalted butter, melted
- 1 × 395 g can sweetened condensed milk
- 1 cup boiling water
- ½ cup lemon juice
- 3 tsp gelatine
- ¼ cup cold water
- 1 packet (85 g) red jelly crystals (raspberry or strawberry flavour)
- 1 packet (85 g) green jelly crystals (lime flavour)
- 2 cups boiling water (1 cup per jelly packet)
- 2 cups cold water (1 cup per jelly packet)
Instructions
- Preheat oven to 180°C (350°F).
- Combine crushed biscuits and melted butter in a bowl.
- Press the mixture into the base of a lined baking dish.
- In a bowl, mix sweetened condensed milk, boiling water, lemon juice, gelatine, and cold water until smooth.
- Pour the creamy mixture over the biscuit base and refrigerate until set.
- Prepare the red jelly by dissolving the crystals in 1 cup of boiling water and adding 1 cup of cold water. Let it cool.
- Pour the cooled red jelly over the cream layer and refrigerate until set.
- Repeat the process for the green jelly.
- Once all layers are set, slice and serve chilled.
Notes
- Ensure each layer is fully set before adding the next.
- Use fresh lemon juice for best flavor.
- Chill the dessert for several hours for optimal texture.
- Prep Time: 30 minutes
- Cook Time: 0 minutes
- Category: Dessert
- Method: Refrigeration
- Cuisine: Australian
Nutrition
- Serving Size: 1 slice
- Calories: 250
- Sugar: 20 g
- Sodium: 50 mg
- Fat: 10 g
- Saturated Fat: 6 g
- Unsaturated Fat: 4 g
- Trans Fat: 0 g
- Carbohydrates: 35 g
- Fiber: 1 g
- Protein: 3 g
- Cholesterol: 15 mg
Keywords: Green & Red Christmas Jelly, Christmas dessert, festive jelly, holiday treat
