
Oh my goodness, let me tell you about the *No-Bake Cookie Dough Cheesecake*! This dessert is truly a slice of heaven, combining the rich and creamy goodness of cheesecake with the irresistible flavors of cookie dough. I remember the first time I made it for a gathering with friends; it was a warm summer evening, and as I pulled this beauty from the fridge, everyone’s eyes lit up! It was gone in minutes, and the compliments just kept coming. It’s that kind of dessert that brings people together and makes them feel a little bit happier.
This cheesecake is perfect for any occasion, whether it’s a birthday party, a cozy family dinner, or just because you want to treat yourself (and trust me, you deserve it!). The best part? It’s no-bake! That means you can whip it up without turning on the oven, making it a fantastic option for those hot days when you want something sweet but don’t want to heat up the kitchen. The layers of cookie dough and creamy cheesecake create a delightful contrast in textures, and those mini chocolate chips? They’re the cherry on top! So, grab your mixing bowl, and let’s dive into this heavenly creation.
Why You’ll Love No-Bake Cookie Dough Cheesecake
Oh, where do I even begin with this delightful No-Bake Cookie Dough Cheesecake? First off, it’s super easy to make! Seriously, you don’t need to be a baking whiz to whip this up. Just a few simple steps, and you’ll have a crowd-pleaser that looks like it came straight from a fancy bakery. Plus, there’s no baking involved, which means no worrying about undercooked or overbaked disasters. Just mix, layer, and chill!
Then there’s the flavor! Imagine the luscious creaminess of cheesecake paired with the nostalgic taste of cookie dough—it’s like a party in your mouth! Each bite is a perfect balance of sweet, creamy, and just a tad chewy from the cookie dough. And those mini chocolate chips scattered throughout? They bring an extra pop of joy with every forkful!
And let’s not forget how fun it is to make! You get to play with cookie dough, which is always a hit with kids and adults alike. Trust me, as you’re mixing and assembling, you’ll find yourself grinning from ear to ear. This dessert is more than just a treat; it’s an experience that you’ll want to share with everyone. So, let’s get started on this delicious adventure!
Ingredients You’ll Need
- 1 ¼ cups (175g) all-purpose flour, heat treated (this step is super important for safety!)
- ½ cup (113g) unsalted butter, softened (I love using Danish Creamery for that rich flavor)
- ½ cup (95g) granulated sugar
- 1/3 cup (73g) light brown sugar, packed (the brown sugar adds that lovely caramel note)
- ¼ teaspoon salt
- 3 tablespoons (45ml) milk (any kind will do, but whole milk gives a creamier texture)
- 1 tablespoon (15ml) vanilla extract (always go for pure vanilla for the best flavor!)
- ½ cup (90g) mini chocolate chips (because who can resist those little bites of joy?)
- 1 package (13oz) chocolate chip cookies (such as Chips Ahoy, for the crust)
- 7 tablespoons (127g) Danish Creamery Unsalted Butter, melted (it’s all about that buttery goodness!)
- 4 ounces (113g) white chocolate (melted for that creamy cheesecake layer)
- 1 cup (236ml) + 2 tablespoons (30ml) heavy whipping cream, divided (trust me, this makes it so luscious!)
- ½ cup (65g) powdered sugar (to sweeten up the whipped cream)
- 16 ounces (452g) full-fat cream cheese, at room temperature (softened for easy mixing)
- ¼ cup (55g) light brown sugar (for that extra layer of flavor)
- 2 teaspoons (10ml) pure vanilla extract (yes, more vanilla because it’s fabulous!)
- ¾ cup (177ml) heavy whipping cream (for the heavenly whipped topping)
- 3 tablespoons (24g) powdered sugar (to sweeten the topping)
- Hot fudge sauce (optional, but why not? It’s chocolate!)
- Mini chocolate chips (optional, for garnish and fun)
Step-by-Step Instructions
Preparing the Cookie Dough
Let’s kick things off by making that delicious cookie dough! In a large mixing bowl, combine the heat-treated flour, softened unsalted butter, granulated sugar, light brown sugar, and salt. I like to use a hand mixer for this part, but you can totally mix it by hand if you prefer. Just make sure it’s well combined and fluffy!
Next, add in the milk and vanilla extract. Mix until everything is combined, and don’t forget to scrape down the sides of the bowl to make sure no flour is left behind. Trust me, you want every bit of that cookie dough flavor! Finally, fold in the mini chocolate chips. Oh, the joy of seeing those little gems get incorporated! Set this bowl aside while we move on to the crust.
Making the Crust
For the crust, we’re going to use those chocolate chip cookies! Grab a zip-top bag and crush them into fine crumbs. You can use a rolling pin or just your hands—whatever floats your boat! Once you’ve got your cookie crumbs, pour them into a mixing bowl and add in the melted Danish Creamery unsalted butter. Mix it all together until the crumbs are fully coated; it should feel like wet sand.
Now it’s time to press this mixture into the bottom of your cheesecake pan. Use the back of a measuring cup or your fingers to really pack it down tightly. This will create a sturdy crust that can hold up all that luscious cheesecake filling. Pop this crust into the fridge while we prepare the filling. It helps to firm it up a bit before we add the good stuff!
Preparing the Cheesecake Filling
Alright, let’s make that creamy cheesecake filling! Start by melting the white chocolate in a microwave-safe bowl. Heat it in 20-second intervals, stirring in between, until it’s smooth and melted. Be careful not to overheat it; we want it just warm enough to mix in.
In another large mixing bowl, whip 1 cup of heavy whipping cream until stiff peaks form. This is where it gets fluffy and dreamy! In a separate bowl, combine the room-temperature cream cheese, powdered sugar, light brown sugar, and vanilla extract. Beat it until it’s nice and smooth. Then, gently fold in the melted white chocolate until it’s fully incorporated.
Finally, take that whipped cream we made earlier and gently fold it into the cream cheese mixture. You want to keep it airy, so use a spatula to carefully combine until it’s all blended together. The texture should be light and creamy—just heavenly!
Assembling and Chilling
Now for the fun part—assembling our cheesecake! Grab your crust from the fridge and pour that creamy cheesecake filling right on top. Spread it out evenly with a spatula. It already looks so good, doesn’t it? Once it’s all smooth, cover the pan with plastic wrap and pop it in the fridge.
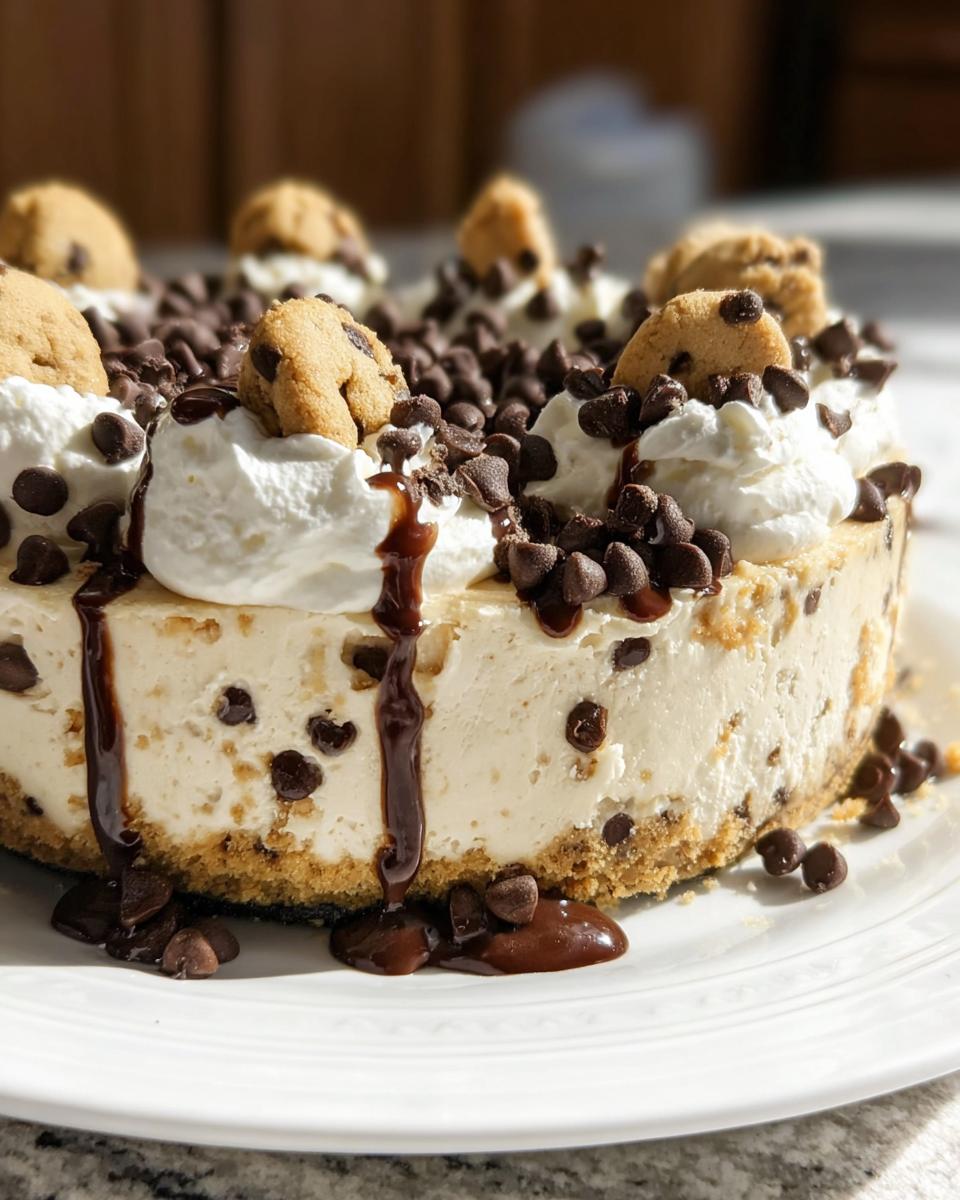
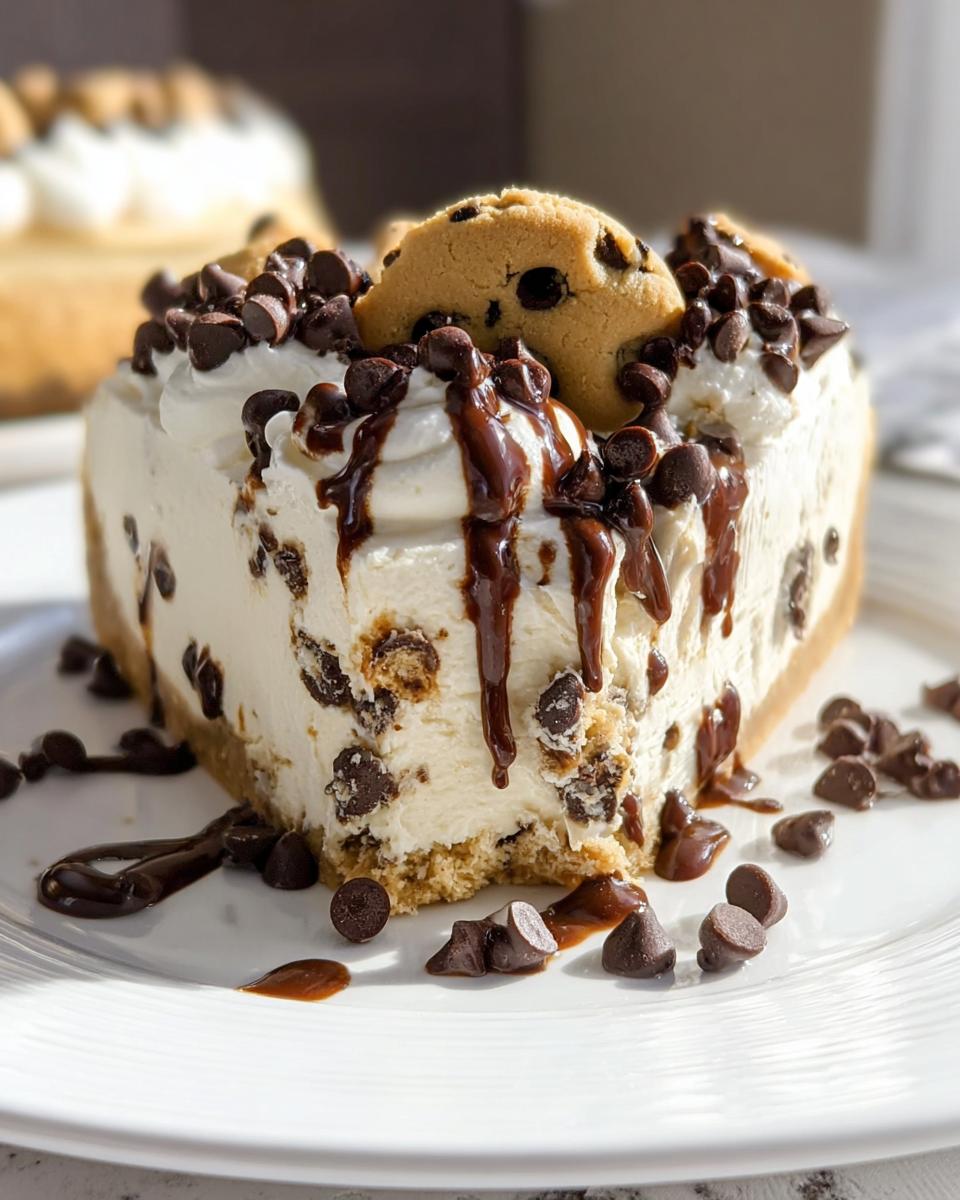
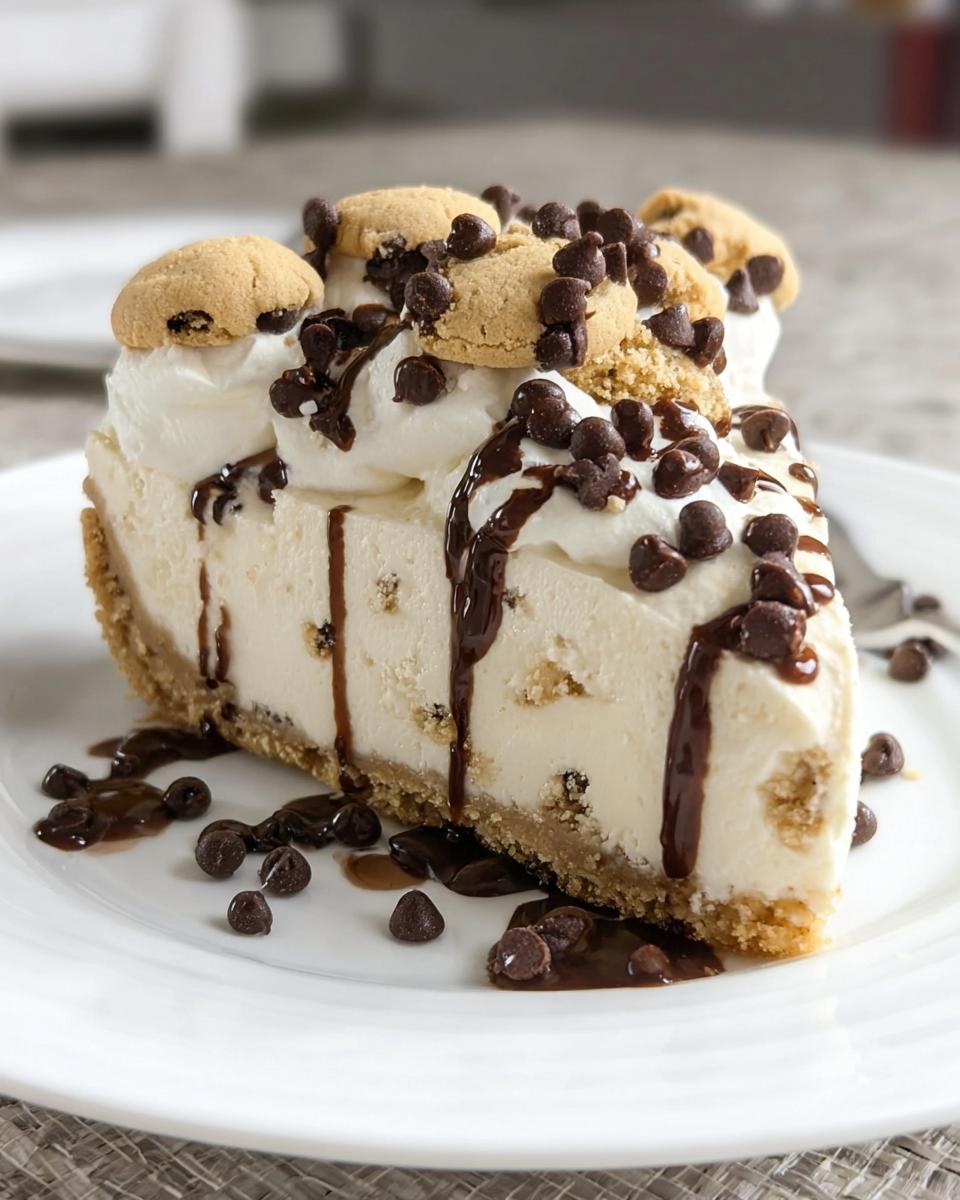
Here’s where the magic happens! You’ll want to chill this beauty for at least 4 hours, but overnight is even better if you can wait. This allows the cheesecake to set properly and develop that perfect texture. Once it’s ready, you can top it with whipped cream, hot fudge sauce, and extra mini chocolate chips if you’re feeling extra indulgent! Get ready for the compliments to roll in!
Variations
The beauty of this No-Bake Cookie Dough Cheesecake is that it’s super versatile, so feel free to get creative with it! One fun variation is to switch up the cookie dough flavor. Instead of the classic chocolate chip, try using peanut butter cookie dough or even snickerdoodle dough for a unique twist. The flavor combinations are endless, and you can really tailor it to your taste buds!
If you’re feeling adventurous, you can also experiment with the toppings! Instead of hot fudge, try drizzling caramel sauce or even a berry compote for a fruity touch. I love topping it off with crushed Oreos or even sprinkles for a festive look—perfect for birthdays or celebrations!
And for those who are looking for a lighter version, consider using Greek yogurt in place of some of the cream cheese for a tangy flavor that still delivers on creaminess. You could even use dairy-free cream cheese and coconut whipped cream for a delicious vegan take on this cheesecake! The possibilities are really endless, so don’t hesitate to let your imagination run wild in the kitchen!
Serving and Storage Tips
When it comes to serving your No-Bake Cookie Dough Cheesecake, the options are as delightful as the dessert itself! I like to cut it into generous slices and serve it chilled right from the fridge. You can garnish each slice with a dollop of whipped cream, a drizzle of hot fudge sauce, and a sprinkle of mini chocolate chips for that extra touch of indulgence. It not only looks gorgeous but also adds to the deliciousness with every bite!
If you’re serving it at a gathering, consider placing the cheesecake on a beautiful cake stand to showcase its layers. It makes a stunning centerpiece and will have everyone eager to dig in. You can also accompany it with fresh berries for a pop of color and a hint of freshness that pairs beautifully with the richness of the cheesecake.
As for leftovers (if there are any, which is rare!), storing your cheesecake properly is key to keeping it fresh. Make sure to cover the cheesecake tightly with plastic wrap or transfer it to an airtight container to prevent it from absorbing any odors from the fridge. It’ll last about 3 to 5 days in the refrigerator. You can also slice it up and freeze individual pieces for a quick treat later on! Just wrap each slice in plastic wrap and then place them in a freezer-safe container. They should keep well for up to 2 months.
When you’re ready to enjoy those frozen slices, simply take them out and let them thaw in the fridge for a few hours (or overnight). You can then garnish them again if you like, and you’ll have a delicious dessert that tastes just as good as when it was first made! Trust me, having these little slices of heaven stashed away is a game changer!
Helpful Notes
Before you dive into making your No-Bake Cookie Dough Cheesecake, here are some handy tips to ensure your dessert turns out just perfect!
First and foremost, using heat-treated flour is crucial for this recipe. It’s a safety measure to eliminate any potential bacteria since we’re using raw flour in the cookie dough. You can easily heat-treat flour by spreading it on a baking sheet and baking it at 350°F (175°C) for about 5-10 minutes. Let it cool completely before using it in your recipe.
Room temperature cream cheese is another important factor. It mixes much more smoothly when it’s at room temperature, making it easier to achieve that creamy texture we all love. So, take your cream cheese out of the fridge about an hour before you start mixing, and you’ll be good to go!
If you’re looking for nutritional variations, consider using reduced-fat cream cheese or a dairy-free alternative if you have dietary restrictions. You can also swap out some of the sugars for natural sweeteners like honey or maple syrup if you want to cut down on refined sugars. Just keep in mind that the flavor and texture may vary slightly, but it’s all about finding what works best for you!
Lastly, don’t be afraid to experiment with the ingredients. This cheesecake is super adaptable, so if you have any allergies or preferences, feel free to tweak it! The joy of baking is all about making it your own!
Frequently Asked Questions
1. Can I freeze this cheesecake?
Absolutely! You can freeze your No-Bake Cookie Dough Cheesecake. Just wrap individual slices in plastic wrap and place them in a freezer-safe container. They should last up to 2 months.
2. What if I don’t have heat-treated flour?
No worries! You can easily heat-treat your flour at home by spreading it on a baking sheet and baking it at 350°F (175°C) for about 5-10 minutes. Just let it cool before using it in your recipe.
3. Can I use low-fat cream cheese?
Yes, you can use low-fat cream cheese if you want a lighter version. Just keep in mind that it may not be as rich and creamy as the full-fat version, but it will still taste great!
4. How do I know when the cheesecake is set?
The cheesecake should be firm to the touch and hold its shape when you slice into it. If it’s still jiggly in the center after chilling for 4 hours, give it a bit more time in the fridge.
5. Can I use different types of chocolate chips?
Definitely! Feel free to swap in dark chocolate or white chocolate chips for a different flavor profile. You can even try using butterscotch chips for a fun twist!
Final Thoughts
Making and sharing this No-Bake Cookie Dough Cheesecake is truly one of the joys of being in the kitchen! It’s more than just a dessert; it’s a way to bring friends and family together, creating sweet memories that linger long after the last slice is gone. There’s something special about watching people’s faces light up when they take that first bite—it’s pure happiness!
I encourage you to give this recipe a try, whether it’s for a special occasion or just a little midweek treat for yourself. Don’t forget to get creative with your own twists and flavors! And please, I’d love to hear how your cheesecake turns out. Share your experiences, tips, and any fun variations you come up with. Happy baking, my friends! Enjoy every delicious bite!
Print
No-Bake Cookie Dough Cheesecake
- Total Time: 4 hours 30 minutes
- Yield: 12 servings 1x
- Diet: Vegetarian
Description
No-Bake Cookie Dough Cheesecake is a rich and creamy dessert featuring layers of cookie dough and cheesecake.
Ingredients
- 1 ¼ cups (175g) all-purpose flour, heat treated
- ½ cup (113g) unsalted butter, softened
- ½ cup (95g) granulated sugar
- 1/3 cup (73g) light brown sugar, packed
- ¼ teaspoon salt
- 3 tablespoons (45ml) milk
- 1 tablespoon (15ml) vanilla extract
- ½ cup (90g) mini chocolate chips
- 1 package (13oz) chocolate chip cookies (such as Chips Ahoy)
- 7 tablespoons (127g) Danish Creamery Unsalted Butter, melted
- 4 ounces (113g) white chocolate
- 1 cup (236ml) + 2 tablespoons (30ml) heavy whipping cream, divided
- ½ cup (65g) powdered sugar
- 16 ounces (452g) full-fat cream cheese, at room temperature
- ¼ cup (55g) light brown sugar
- 2 teaspoons (10ml) pure vanilla extract
- ¾ cup (177ml) heavy whipping cream
- 3 tablespoons (24g) powdered sugar
- Hot fudge sauce (optional)
- Mini chocolate chips (optional)
Instructions
- Prepare cookie dough by mixing flour, softened butter, granulated sugar, brown sugar, salt, milk, and vanilla.
- Add mini chocolate chips and mix well.
- For the crust, crush chocolate chip cookies and mix with melted butter.
- Press the mixture into the bottom of a cheesecake pan.
- Melt white chocolate and let it cool slightly.
- In a bowl, whip 1 cup heavy cream until stiff peaks form.
- In another bowl, beat cream cheese, powdered sugar, brown sugar, and vanilla until smooth.
- Add melted white chocolate to the cream cheese mixture and mix well.
- Fold in whipped cream until combined.
- Spread cheesecake filling over the crust.
- Chill for at least 4 hours or until set.
- Before serving, whip remaining heavy cream with powdered sugar and spread on top of the cheesecake.
- Garnish with hot fudge sauce and mini chocolate chips if desired.
Notes
- Use heat-treated flour to ensure safety.
- Allow cream cheese to reach room temperature for easier mixing.
- Chill the cheesecake overnight for better texture.
- Prep Time: 30 minutes
- Cook Time: 0 minutes
- Category: Dessert
- Method: No-Bake
- Cuisine: American
Nutrition
- Serving Size: 1 slice
- Calories: 450
- Sugar: 30g
- Sodium: 200mg
- Fat: 30g
- Saturated Fat: 18g
- Unsaturated Fat: 8g
- Trans Fat: 0g
- Carbohydrates: 42g
- Fiber: 1g
- Protein: 5g
- Cholesterol: 80mg
Keywords: No-Bake Cookie Dough Cheesecake, dessert, cheesecake, cookie dough
