
Oh my goodness, let me tell you about my absolute favorite holiday treat: No-Bake Christmas Peppermint Pie! Every year, as soon as the first hint of winter hits, I can’t wait to whip up this creamy, dreamy dessert that’s as festive as a cozy night by the fireplace. I remember the first time I made it; I was hosting a little holiday gathering, and everyone went wild for it! The combination of cool peppermint and rich chocolate has a way of making you feel all warm inside, even when it’s cold outside.
This pie is perfect for any holiday occasion, whether it’s a Christmas party, a cozy family dinner, or just a sweet treat to enjoy while you watch your favorite holiday movies. The best part? You don’t need to turn on the oven! It’s quick to prepare and looks absolutely stunning with its vibrant red candy cane topping. Trust me, it’s a showstopper that will have everyone asking for seconds—and the recipe! So grab your mixing bowl and let’s dive into making this delightful No-Bake Christmas Peppermint Pie!
Why You’ll Love No-Bake Christmas Peppermint Pie
There are so many reasons to fall in love with this No-Bake Christmas Peppermint Pie! First off, it’s ridiculously easy to make. Seriously, you can throw it together in just 20 minutes! I love that it requires no baking at all, which means less time in the kitchen and more time enjoying the holiday festivities with family and friends. Plus, the creamy peppermint filling paired with that crunchy chocolate crust is like a flavor explosion in your mouth!
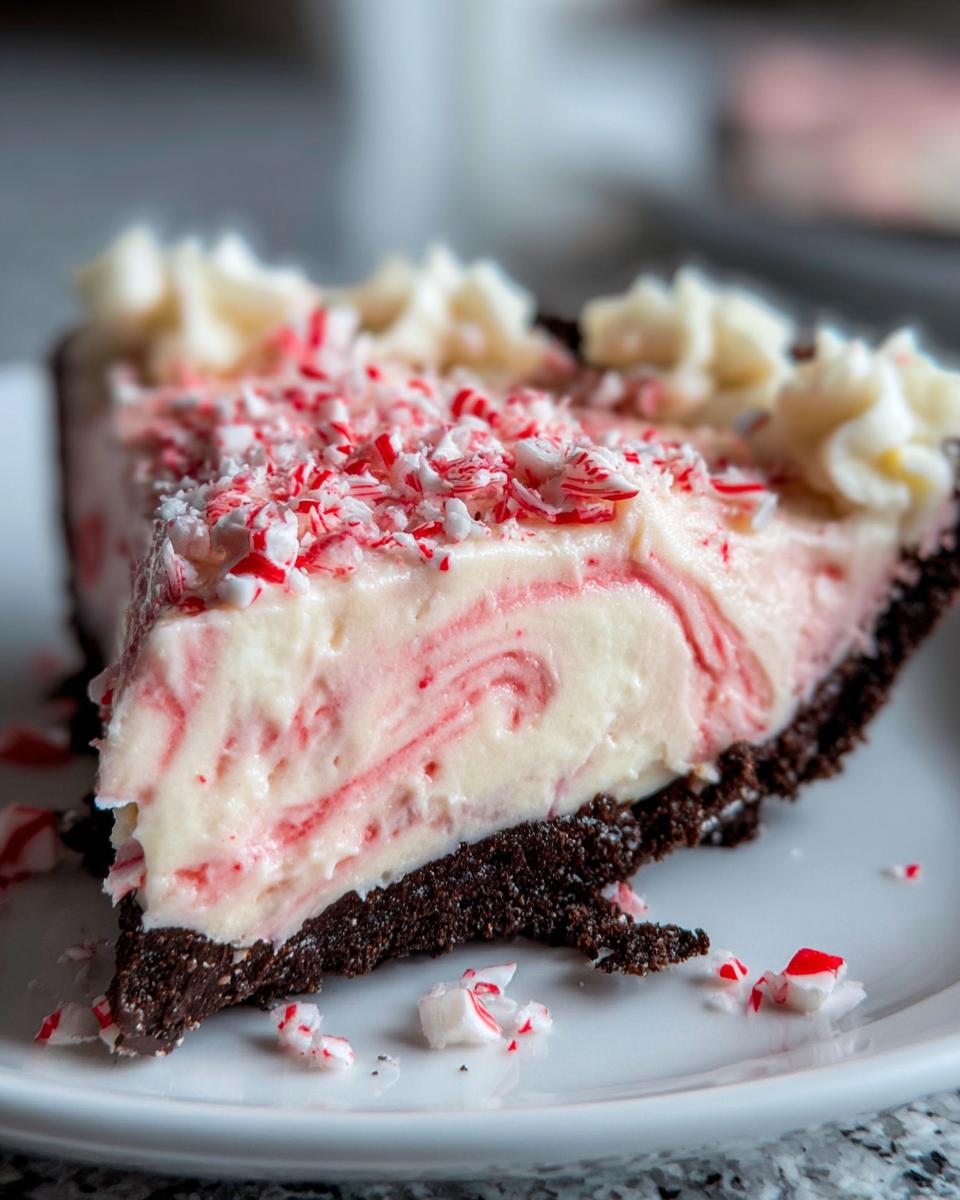
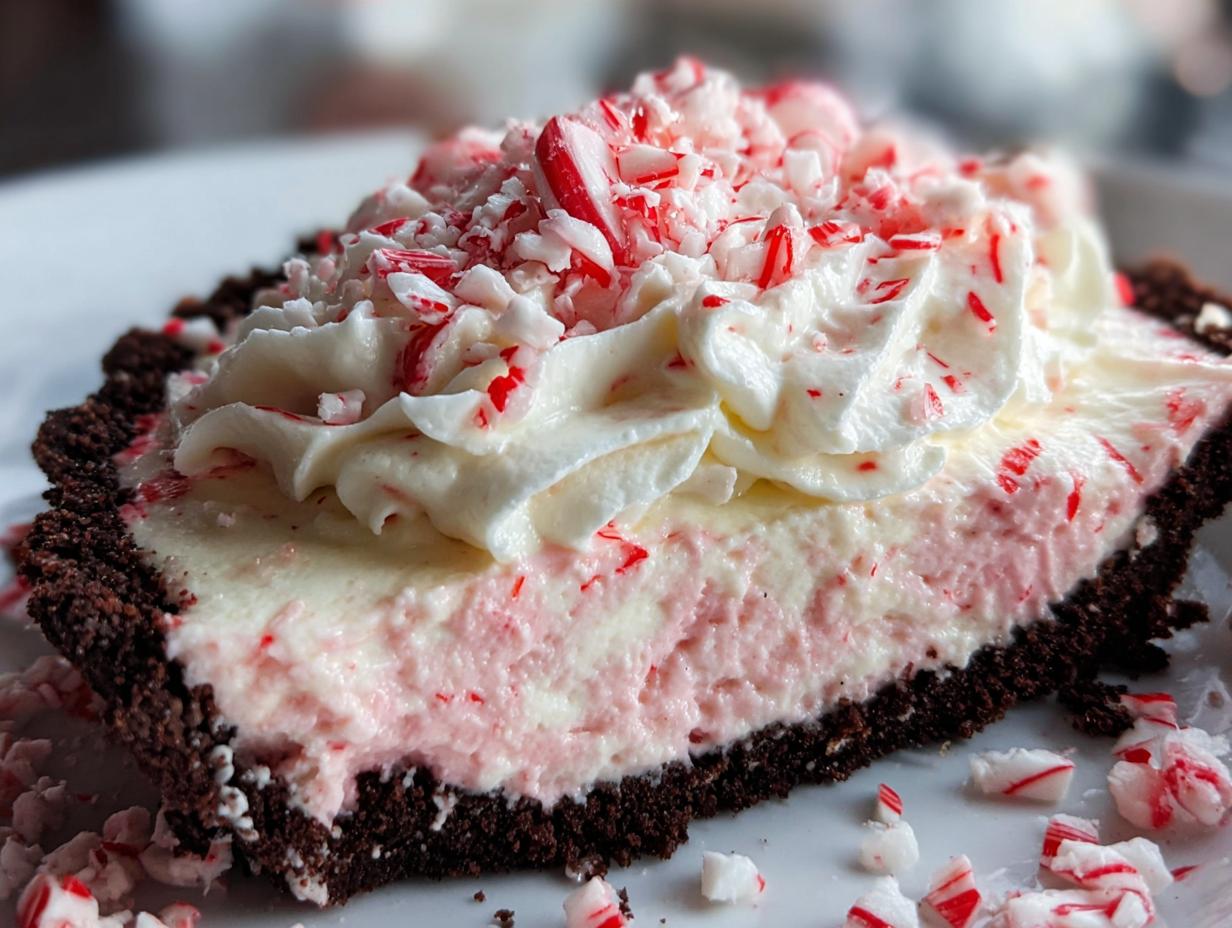
The vibrant colors of the pie, especially when topped with crushed candy canes, make it an eye-catching centerpiece for any holiday dessert table. And let’s not forget the delightful aroma of peppermint that fills your kitchen as you prepare this treat. It’s like a warm hug on a chilly winter day! This pie is perfect for those who want a festive dessert that’s not overly complicated but still tastes like a million bucks. Trust me, once you try it, you’ll want to make it a holiday tradition!
Ingredients You’ll Need
- 1 pre-made chocolate cookie crust (Oreo or graham cracker) – This is the base of your pie, and using a pre-made crust saves you time! I love the chocolate flavor, but feel free to use whichever you prefer.
- 1 package (8 oz) cream cheese, softened – Make sure your cream cheese is at room temperature before you start; it’ll blend much easier and give you that creamy texture we’re after.
- 1 cup powdered sugar – This adds sweetness to the filling. Trust me, it balances out the cream cheese beautifully!
- 1 tsp peppermint extract – The star of the show! This gives our pie that refreshing peppermint flavor. If you’re a peppermint lover like me, don’t hesitate to add a little extra!
- 2 cups whipped topping (like Cool Whip) – This makes the pie light and fluffy. You can use homemade whipped cream if you prefer, but I find that Cool Whip is super convenient.
- A few drops red food coloring (optional) – If you want to add a pop of color and create a festive pink swirl, toss in a few drops! It’s all about presentation, right?
- ½ cup crushed candy canes (plus extra for topping) – These add a delightful crunch and a burst of peppermint flavor. You can crush them with a rolling pin or pulse them in a food processor for smaller bits.
Step-by-Step Instructions
Preparing the Creamy Filling
Alright, let’s get to the fun part—making that luscious filling! First, grab a mixing bowl and toss in your softened cream cheese. You want to beat it until it’s super smooth and creamy, which usually takes about 2-3 minutes with an electric mixer. Trust me, don’t skip this step; it makes all the difference in texture!
Once your cream cheese is nice and fluffy, it’s time to add in the powdered sugar and peppermint extract. Mix these in until everything is just combined. You’re aiming for a creamy consistency that tastes like peppermint heaven. If you’re feeling extra festive, go ahead and add a little more peppermint extract for a stronger flavor—just a drop at a time, though, as it can get quite potent!
Now, let’s lighten things up a bit! Gently fold in the whipped topping. I like to use a spatula for this part; it keeps the mix airy and fluffy. It’s all about folding—not stirring—so take your time and be gentle! If you want to add those pretty red food coloring drops for a pink swirl, now’s the time! Just swirl them in gently to create a marbled effect.
Assembling the Pie
With that creamy filling ready, let’s move on to assembling our pie! Take your pre-made chocolate cookie crust and set it on a sturdy plate or pie dish. Carefully spoon the peppermint filling into the crust. I like to start from the center and work my way out to the edges. This way, you get a nice, even layer! Once the filling is in, smooth the top with your spatula. A smooth top not only looks great but also helps when you’re adding those crushed candy canes later.
Speaking of which, before you move on, sprinkle some of those crushed candy canes over the top of your filling for a festive touch! You can even press them in slightly to make sure they stick. It just adds that extra bit of crunch and holiday cheer!
Setting the Pie
Now comes the hardest part—waiting! Pop your pie into the refrigerator and let it chill for at least 4 hours. This is when all those flavors meld together beautifully and the filling sets up perfectly. You can actually make this pie a day in advance, which I highly recommend for stress-free holiday entertaining. Just make sure to cover it with plastic wrap or a lid so it doesn’t absorb any fridge odors.
When you’re ready to serve, you’ll know it’s set when the filling is firm to the touch. Slice it up, add a few more crushed candy canes on top if you like, and voila! You’ve got a stunning, delicious No-Bake Christmas Peppermint Pie that’s sure to impress your guests. Enjoy every creamy, minty bite!
Variations
Oh, the possibilities are endless when it comes to jazzing up your No-Bake Christmas Peppermint Pie! If you want to switch it up, how about trying a chocolate mint version? Just add some melted chocolate to the creamy filling for a richer taste that pairs beautifully with the peppermint. You can even drizzle some chocolate on top for that extra wow factor!
If you’re in the mood for a fruity twist, consider replacing the peppermint extract with vanilla extract and adding some crushed strawberries or raspberries instead of candy canes. It’ll give you a lovely berry flavor that’s still festive but with a fresh vibe.
For those who love a bit of crunch, try mixing in some chopped nuts like pecans or walnuts into the filling or sprinkle them on top for added texture. And if you want a completely different flavor experience, swap out the chocolate crust for a gingersnap cookie crust! It’ll introduce a warm, spicy element that’s perfect for the holidays.
Whichever variation you choose, just remember to have fun with it! Each twist adds its own holiday charm to this already delightful dessert.
Serving and Storage Tips
When it comes to serving your No-Bake Christmas Peppermint Pie, I like to keep it simple yet festive! Slice it into generous wedges and serve it chilled right from the fridge. You can add a dollop of extra whipped topping on each slice for that creamy touch and sprinkle some more crushed candy canes on top for a beautiful presentation—totally Instagram-worthy!
This pie is perfect for holiday gatherings, parties, or as a sweet ending to a cozy family dinner. If you want to get a bit fancy, consider pairing it with a warm cup of hot cocoa or a scoop of vanilla ice cream on the side. Yum!
Now, let’s talk about storage! If you happen to have any leftovers (which is rare, trust me), you can easily store them in the refrigerator for up to 3 days. Just make sure to cover the pie with plastic wrap or a tight-fitting lid to keep it fresh and prevent it from absorbing any other fridge odors. If you want to make it ahead of time, feel free to prepare it a day in advance. Just remember, the longer it sits, the more those flavors meld together, making it even more delicious!
Helpful Notes
Let’s talk about some handy tips to make your No-Bake Christmas Peppermint Pie even more fabulous! First off, if you’re a peppermint enthusiast like I am, feel free to adjust the peppermint extract to your liking. Just remember, a little goes a long way, so start with the recommended amount and taste as you go!
If you want to make this pie in advance (which I totally recommend!), go ahead and whip it up a day before your event. Just make sure to keep it covered in the fridge, so it stays fresh and delicious. The flavors get even better as they mingle overnight!
For a unique twist, try swapping out the cream cheese for a dairy-free alternative if you’re catering to a vegan crowd. There are some fantastic options available that will still give you that creamy texture. Also, if you want to make slicing easier, run your knife under hot water before cutting into the pie. It helps create clean slices—perfect for presentation!
And don’t forget, you can customize the toppings! Consider adding a drizzle of chocolate syrup or even some crushed cookies for a fun crunch. The sky’s the limit when it comes to making this pie your own!
Frequently Asked Questions
1. Can I freeze this pie?
Absolutely! You can freeze the No-Bake Christmas Peppermint Pie for up to 2 months. Just make sure to cover it tightly with plastic wrap or aluminum foil to prevent freezer burn. When you’re ready to enjoy it, let it thaw in the fridge for a few hours before serving.
2. What if I don’t have peppermint extract?
No worries! If you’re out of peppermint extract, you can substitute it with vanilla extract for a different flavor profile. Just keep in mind that it won’t have that classic peppermint taste, but it’ll still be delicious!
3. Can I use homemade whipped cream instead of Cool Whip?
Definitely! Homemade whipped cream is a fantastic option if you want a fresher taste. Just whip some heavy cream until stiff peaks form, and fold it gently into the cream cheese mixture as you would with the Cool Whip.
4. How long can I store leftovers?
Leftovers can be stored in the refrigerator for up to 3 days. Just remember to cover the pie with plastic wrap or a lid to keep it fresh. The longer it sits, the more the flavors meld, making it even more delicious!
5. Can I make this pie dairy-free?
Yes! You can use dairy-free cream cheese and a non-dairy whipped topping to make this pie suitable for a dairy-free diet. Just check the labels to ensure they meet your dietary needs, and you’ll have a delicious dairy-free No-Bake Christmas Peppermint Pie!
Final Thoughts
So there you have it—my go-to No-Bake Christmas Peppermint Pie! This delightful dessert is not only a breeze to whip up, but it also brings the festive spirit right to your table. With its creamy peppermint filling and crunchy chocolate crust, every bite is a delicious reminder of all the joy this season brings. I truly hope you give this pie a try, whether it’s for a holiday gathering or just a sweet treat for yourself. Trust me, once you take that first creamy bite, you’ll understand why it’s become a cherished favorite in my home. Happy baking (or should I say, no-baking)! Enjoy every delightful moment this holiday season!
Print
No-Bake Christmas Peppermint Pie
- Total Time: 4 hours 20 minutes
- Yield: 8 servings 1x
- Diet: Vegetarian
Description
A delightful no-bake dessert featuring a creamy peppermint filling on a chocolate crust.
Ingredients
- 1 pre-made chocolate cookie crust (Oreo or graham cracker)
- 1 package (8 oz) cream cheese, softened
- 1 cup powdered sugar
- 1 tsp peppermint extract
- 2 cups whipped topping (like Cool Whip)
- A few drops red food coloring (optional, for a pink swirl look)
- ½ cup crushed candy canes (plus extra for topping)
Instructions
- In a mixing bowl, beat the softened cream cheese until smooth.
- Add powdered sugar and peppermint extract. Mix until combined.
- Fold in the whipped topping until well blended.
- If desired, add red food coloring for a pink swirl effect.
- Gently fold in crushed candy canes.
- Spoon the filling into the chocolate cookie crust and smooth the top.
- Refrigerate for at least 4 hours or until set.
- Before serving, top with extra crushed candy canes.
Notes
- Store leftovers in the refrigerator.
- For a stronger peppermint flavor, increase the peppermint extract.
- This pie can be made a day in advance.
- Prep Time: 20 minutes
- Cook Time: 0 minutes
- Category: Dessert
- Method: No-Bake
- Cuisine: American
Nutrition
- Serving Size: 1 slice
- Calories: 250
- Sugar: 20g
- Sodium: 150mg
- Fat: 12g
- Saturated Fat: 7g
- Unsaturated Fat: 3g
- Trans Fat: 0g
- Carbohydrates: 32g
- Fiber: 1g
- Protein: 2g
- Cholesterol: 30mg
Keywords: No-Bake Christmas Peppermint Pie, dessert, holiday dessert, peppermint pie
