
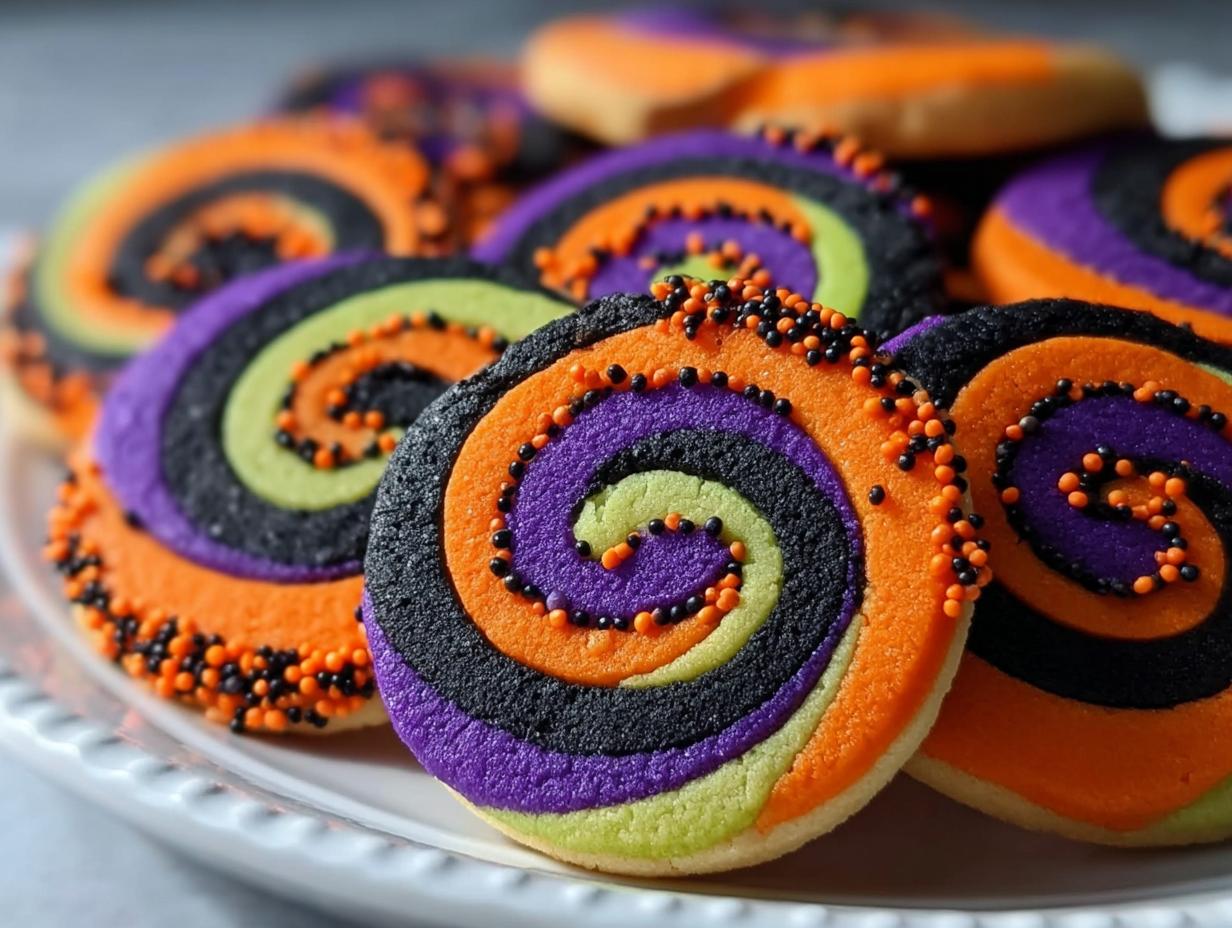
Oh my goodness, have you ever made Halloween Pinwheel Sugar Cookies? They’re like a burst of festive cheer wrapped up in a delicious little swirl! I remember the first time I whipped these up for a neighborhood Halloween party. The kids were mesmerized by the vibrant colors, and I felt like a baking wizard! These cookies are not just adorable; they’re perfect for any Halloween celebration, whether it’s a spooky gathering or just a cozy night in with your favorite horror flicks.
Every bite is a sweet reminder of the magic of Halloween, and trust me, they’re super easy to make! You’ll love how they fill your kitchen with the warm aroma of sugar and butter. So, roll up your sleeves and let’s dive into making these delightful treats that are sure to impress everyone, from trick-or-treaters to party guests!
Why You’ll Love Halloween Pinwheel Sugar Cookies
Halloween Pinwheel Sugar Cookies are a delightful twist on classic sugar cookies that not only taste amazing but also look downright festive! The swirling colors of orange, purple, and black make these cookies a hit at any Halloween gathering. I mean, who can resist a treat that’s as fun to look at as it is to eat?
These cookies are perfect for little hands to help with, making them a fantastic family activity. You can roll, swirl, and cut them into fun shapes, letting your creativity shine. Plus, they’re great for sharing! Whether you’re bringing them to a Halloween party, filling a spooky treat bag, or just enjoying them while watching your favorite scary movie, they add a touch of whimsy to any occasion. And let’s be honest, the vibrant colors and sweet aroma will have everyone flocking to the cookie platter. You’ll find yourself making these every Halloween – I know I do!
Ingredients You’ll Need
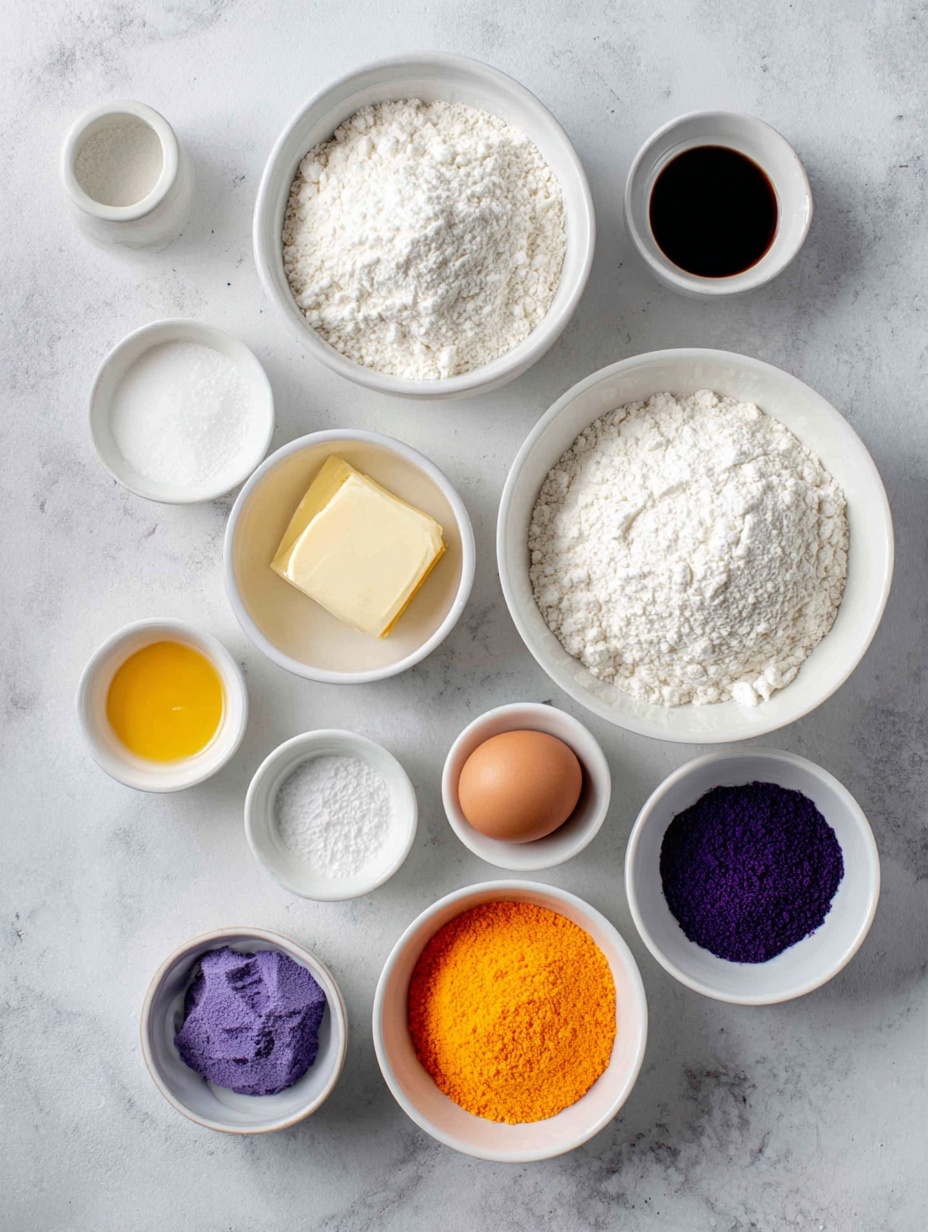
To make these festive Halloween Pinwheel Sugar Cookies, you’ll need a handful of simple ingredients that come together to create magic! Here’s what you’ll need:
- 2 1/2 cups (315g) all-purpose flour, sifted – This is the base of your cookies, giving them that perfect texture. Sifting helps prevent clumps and ensures even mixing.
- 3/4 teaspoon baking powder – This little ingredient helps the cookies rise and gives them that delightful softness. Don’t skip it!
- 1/4 teaspoon fine salt – Just a pinch enhances the sweetness and balances the flavors beautifully.
- 1 cup (226g) unsalted butter, softened – Make sure it’s at room temperature for easy mixing. It adds richness and that melt-in-your-mouth quality we all love!
- 1 cup (200g) granulated sugar – The sweet star of the show! This will help create a lovely crust on your cookies.
- 1 large egg, room temperature – This binds everything together. Room temperature eggs mix better into the dough.
- 2 teaspoons vanilla extract (or almond extract for a twist) – Vanilla brings a warm, sweet aroma. Almond adds a unique flavor that pairs well with the colors!
- Gel food coloring in orange, purple, and black – Get creative with these colors! They’ll make your cookies festive and fun.
- Optional: colored sanding sugar or Halloween sprinkles – If you want to take it up a notch, these make for a sparkly finish!
Gather these ingredients, and you’ll be ready to whip up some Halloween magic in your kitchen! Trust me, the vibrant colors and sweet smells are just the beginning of the fun.
Step-by-Step Instructions
Preparing the Dough
Alright, let’s get started on making that dough! First, grab a large mixing bowl and combine the sifted all-purpose flour, baking powder, and salt. Give it a good whisk to ensure everything is evenly mixed. This step is super important, so don’t rush it! In another bowl, cream together the softened butter and granulated sugar. I like to use an electric mixer for this part because it makes the butter light and fluffy – about 2-3 minutes should do the trick. Once that’s done, add in your room temperature egg and vanilla extract. Mix until everything is well incorporated and smooth.
Now, it’s time to bring the dry ingredients into the mix. Gradually add the flour mixture to your buttery goodness. I usually do this in three batches, mixing well after each addition until it forms a nice, cohesive dough. If it feels a bit sticky, that’s okay! Just make sure it’s all combined nicely.
Coloring the Dough
Next up, we’re going to color this dough and make it festive! Divide your dough into three equal portions. You can eyeball it, but if you want to be precise, a kitchen scale is your best friend here. Take one portion and place it in a separate bowl. Now, here’s where the fun begins! Using gel food coloring, add a few drops of orange to one portion, purple to another, and black to the last. The gel is super concentrated, so start with a little and add more if you want bolder colors.
Now, wear some gloves or use a spatula to mix the colors into the dough. Don’t be afraid to really knead it in – this is where you’ll see the magic happen! Wow, look at those vibrant colors! Just remember to wash your hands and any surfaces afterward to avoid turning everything into a Halloween painting!
Rolling and Chilling
Now that your dough is beautifully colored, it’s time to roll it out. Take each colored portion and place it between two sheets of parchment paper. Using a rolling pin, roll each piece into a rectangle about 1/4 inch thick. Don’t stress if they’re not perfect rectangles; a little character makes them even more charming! Once rolled out, carefully peel the top layer of parchment off. If the dough sticks, gently lift it with a spatula.
Next, stack the colored dough layers on top of each other, making sure they align nicely. You can get creative here – the order of colors is entirely up to you! Once you’ve stacked them, roll the dough tightly into a log, starting from one short end. It’s like making a colorful burrito of cookie goodness! Once you’ve got your log, wrap it in plastic wrap and pop it into the refrigerator for about 30 minutes. Chilling is crucial here, as it helps the cookies keep their shape while baking. Plus, it makes slicing easier!
Baking the Cookies
After your dough has chilled, it’s finally time to bake these beauties! Preheat your oven to 350°F (175°C) if you haven’t done so already. Take the log out of the fridge and carefully unwrap it. Using a sharp knife, slice the log into cookies about 1/4 inch thick. Place them on a baking sheet lined with parchment paper, leaving some space between each cookie because they will spread a little while baking.
Bake these cookies for about 10-12 minutes, or until the edges turn a light golden brown. Keep an eye on them, as oven times can vary! When they’re ready, let them cool on the baking sheet for a few minutes before transferring them to wire racks to cool completely. Oh, the smell in your kitchen will be heavenly! And just like that, your Halloween Pinwheel Sugar Cookies are ready to steal the show!
Variations
Now that you’ve got the basics down, let’s talk about how to mix things up and make these Halloween Pinwheel Sugar Cookies even more creative and fun! One of my favorite things to do is experiment with different flavor extracts. Instead of vanilla, try using almond extract for a nutty twist, or even orange extract to enhance that Halloween vibe! You can also add a teaspoon of cinnamon for a little spice that pairs beautifully with the sweetness.
If you’re feeling extra adventurous, why not switch up the colors? Use gel food coloring to create a spooky green and black combo, or go for classic Halloween colors like bright yellow and purple. The possibilities are endless! You could even create a “poison apple” theme by using red and green dough. And don’t forget about the toppings! Instead of just sanding sugar, consider drizzling melted white chocolate over the cooled cookies for a spooky effect, or sprinkle on some crushed candy corn for an extra festive touch. Whatever you choose, the goal is to have fun and let your creativity shine!
Serving and Storage Tips
When it comes to serving your Halloween Pinwheel Sugar Cookies, the presentation can really elevate the spooky fun! I love to arrange them on a colorful platter, maybe with some mini pumpkins or creepy decorations to really set the mood. These cookies are delightful on their own, but you can also serve them with a side of festive hot cocoa or a spooky punch for a complete Halloween treat experience.
As for storage, you’ll want to keep these cookies fresh and ready for snacking! Place them in an airtight container at room temperature, and they’ll stay fresh for about a week. If you want to keep them longer, you can freeze the cookies! Just make sure they’re fully cooled, then layer them between sheets of parchment paper in a freezer-safe container. They’ll last up to three months in the freezer. When you’re ready to enjoy them, just let them thaw at room temperature or pop them in the microwave for a few seconds. Trust me, they make for a perfect little treat any time of year!
Helpful Notes
When making Halloween Pinwheel Sugar Cookies, there are a few handy tips to keep in mind that can make your baking experience smoother and more enjoyable! First off, if you’re looking to make these cookies a bit healthier, you can substitute half of the all-purpose flour with whole wheat flour. It’ll add a nice nutty flavor and a bit more fiber!
If you have any dietary restrictions, feel free to explore alternatives. For a dairy-free version, simply swap the butter with a plant-based butter and use a flax egg (1 tablespoon ground flaxseed mixed with 2.5 tablespoons water) in place of the egg. This way, everyone can join in on the Halloween fun!
Also, don’t hesitate to experiment with the shapes of your cookies! While pinwheel slices are adorable, you could use cookie cutters to create spooky shapes like bats, ghosts, or pumpkins. Just remember to chill your dough after cutting to maintain those shapes while baking. Lastly, have fun with the colors! Mixing colors can create some awesome effects; try swirling them for a marbled look or layering them in fun combinations. The key is to enjoy the process and make these cookies your own!
Frequently Asked Questions
1. Can I freeze these cookies?
Absolutely! These Halloween Pinwheel Sugar Cookies freeze really well. Just make sure they’re completely cooled, then layer them between sheets of parchment paper in an airtight container. They can stay fresh in the freezer for up to three months. When you’re ready to enjoy them, let them thaw at room temperature or pop them in the microwave for a few seconds.
2. What if I don’t have gel food coloring?
No worries! If you don’t have gel food coloring, you can use liquid food coloring instead. Just keep in mind that you might need to use a bit more to achieve the same vibrant colors. Alternatively, you can get creative with natural coloring options like beet juice for red or turmeric for yellow!
3. Can I use a different type of flour?
Sure! You can experiment with different types of flour. Whole wheat flour can add a nice nutty flavor, or you could try using gluten-free flour blends. Just be aware that the texture might change a bit, so you may need to adjust the liquid ingredients slightly.
4. How do I prevent my cookies from spreading too much while baking?
To prevent spreading, make sure your butter is softened but not melted when you mix it. Chilling the dough before slicing and baking also helps maintain their shape. If they still spread too much, you might want to experiment with a little extra flour in the dough.
5. How can I make these cookies more festive for Halloween?
To amp up the festive flair, consider adding colored sanding sugar or Halloween-themed sprinkles right after you take them out of the oven. You could also drizzle some melted chocolate on top or use cookie cutters to create spooky shapes. Let your imagination run wild!
Final Thoughts
Making Halloween Pinwheel Sugar Cookies is such a joyful experience! There’s something incredibly satisfying about bringing together vibrant colors, delicious flavors, and a sprinkle of creativity in the kitchen. Whether you’re baking with kids, whipping up a batch for a festive gathering, or simply indulging your sweet tooth, these cookies are bound to bring smiles all around. I encourage you to give this recipe a try and let your imagination run wild with colors and designs!
Don’t forget to share your cookie creations and any fun variations you come up with. I can’t wait to hear about your spooky baking adventures! Happy Halloween and happy baking!
Print
Halloween Pinwheel Sugar Cookies: Sweet and Colorful Treats
- Total Time: 42 minutes
- Yield: 24 cookies 1x
- Diet: Vegetarian
Description
These Halloween Pinwheel Sugar Cookies are festive and fun, perfect for any Halloween celebration.
Ingredients
- 2 1/2 cups (315g) all-purpose flour, sifted
- 3/4 teaspoon baking powder
- 1/4 teaspoon fine salt
- 1 cup (226g) unsalted butter, softened
- 1 cup (200g) granulated sugar
- 1 large egg, room temperature
- 2 teaspoons vanilla extract (or almond extract for a twist)
- Gel food coloring in orange, purple, and black
- Optional: colored sanding sugar or Halloween sprinkles
Instructions
- Preheat your oven to 350°F (175°C).
- In a bowl, mix flour, baking powder, and salt.
- In another bowl, cream butter and sugar until light and fluffy.
- Add egg and vanilla extract, and mix well.
- Gradually combine the dry ingredients with the wet mixture.
- Divide the dough into three portions and color each with food coloring.
- Roll each portion into a rectangle between parchment paper.
- Stack the colored doughs and roll them into a log.
- Chill the log in the refrigerator for about 30 minutes.
- Slice the log into cookies and place on a baking sheet.
- Bake for 10-12 minutes until edges are lightly golden.
- Cool on wire racks and decorate with sanding sugar or sprinkles if desired.
Notes
- Ensure butter is at room temperature for easy mixing.
- Experiment with different colors for a unique look.
- Store cookies in an airtight container to maintain freshness.
- Prep Time: 30 minutes
- Cook Time: 12 minutes
- Category: Dessert
- Method: Baking
- Cuisine: American
Nutrition
- Serving Size: 1 cookie
- Calories: 150
- Sugar: 8g
- Sodium: 50mg
- Fat: 7g
- Saturated Fat: 4g
- Unsaturated Fat: 3g
- Trans Fat: 0g
- Carbohydrates: 20g
- Fiber: 0g
- Protein: 1g
- Cholesterol: 20mg
Keywords: Halloween, cookies, sugar cookies, pinwheel cookies
