
I still remember the first time I made Easy Snowballs with my grandma—she had this magical way of turning simple ingredients into little bites of joy. The kitchen smelled like sugar and vanilla, and I couldn’t resist sneaking a bite before they were even finished. These soft, syrup-soaked treats, rolled in coconut, were always a hit at family gatherings, and now they’re my go-to when I want something sweet without a fuss.
What I love about Easy Snowballs is how effortlessly they come together. Whether it’s a holiday party or just a rainy afternoon with the kids, they always feel special. The cake is tender, the syrup adds just the right amount of sweetness, and that coconut coating? It’s like a cozy hug for your taste buds. Plus, they look so pretty—like tiny snowballs dusted with coconut flakes!
Trust me, once you try these, you’ll see why they’ve been a favorite in my family for years. They’re the kind of dessert that makes people ask, “Can I have the recipe?”—and lucky for you, it’s easier than you think.
Why You’ll Love Easy Snowballs
Honestly, Easy Snowballs are one of those recipes that checks all the boxes—quick, delicious, and impossible to mess up. Here’s why you’ll adore them:
Perfect for Any Occasion
Birthdays, holidays, or just because—these little treats fit right in. They’re fancy enough for a dessert table but simple enough for a Tuesday afternoon snack.
Simple Ingredients You Likely Have
No specialty store runs needed! Flour, sugar, eggs… chances are, your pantry’s already stocked. And if you’re out of coconut? Toast some breadcrumbs for a fun twist.
Fun to Make with Kids
The dipping and rolling part is pure joy for little hands. My niece calls them “snowball factories” and insists on quality control (read: eating half the coconut).
- Quick prep: From bowl to table in under an hour—no kneading, no chilling, just mix and bake.
- Crowd-pleasing flavor: That soft cake + sweet syrup combo? Always a hit.
- Freezer-friendly: Stash extras for surprise guests (or midnight cravings).
- Nostalgic appeal: Tastes like childhood, especially if you grew up with coconut desserts.
Seriously, they’re the dessert equivalent of a cozy blanket—comforting, familiar, and always welcome.
Ingredients You’ll Need for Easy Snowballs
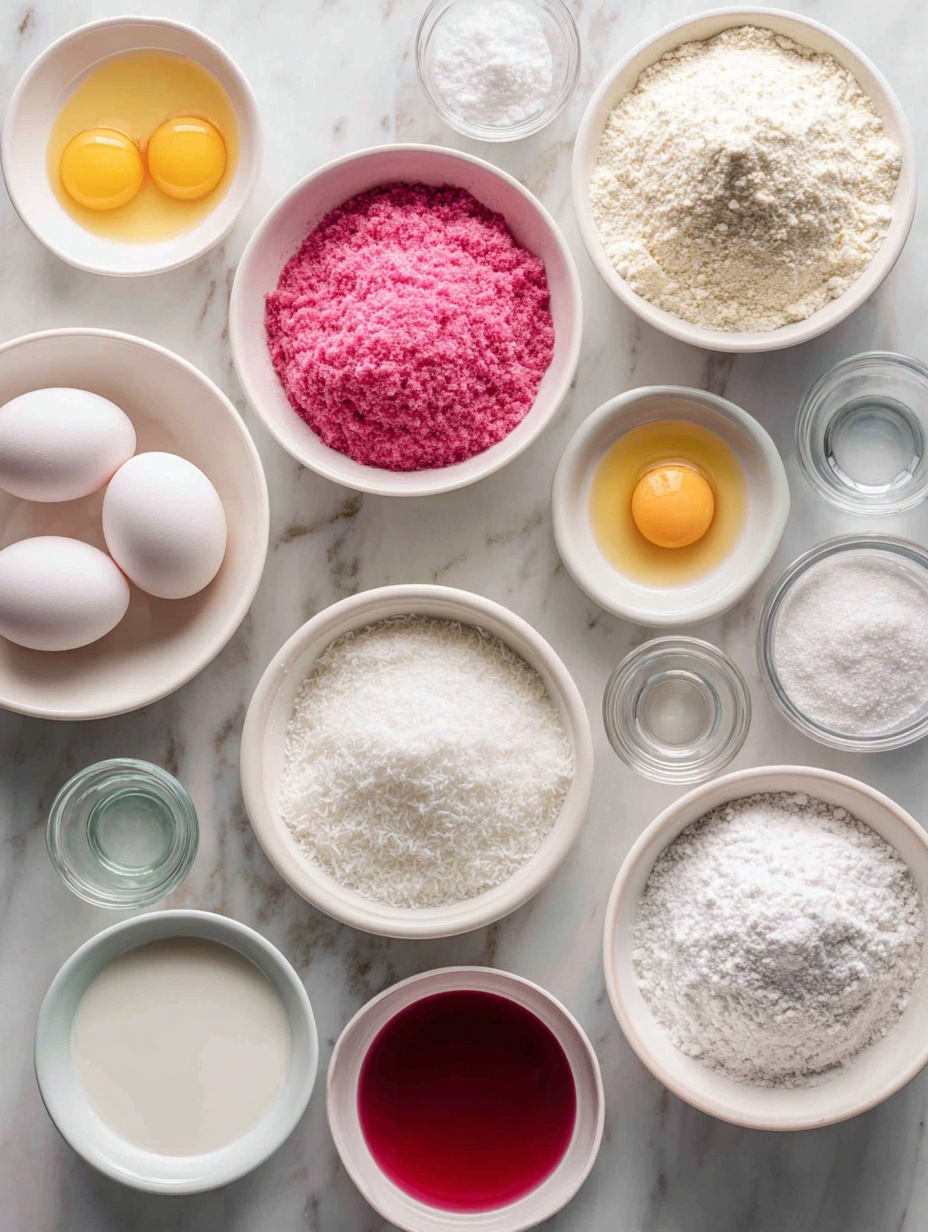
Gather these pantry staples—I promise, nothing fancy here! Just wholesome ingredients that come together to create magic. Pro tip: Measure everything before you start. It makes the process so much smoother.
For the Cake
- 4 large eggs: Room temperature works best—they mix into the batter more evenly. If you forgot to take them out early, just pop them in warm water for 5 minutes.
- 1½ cups sugar: Plain white sugar gives the perfect sweetness, but you can use caster sugar if you want an extra-fine texture.
- 1 tablespoon vanilla essence: The good stuff! It makes all the difference in flavor.
- 1 cup oil: Vegetable oil keeps the cake moist, but melted coconut oil adds a lovely hint of tropical flavor if you’re feeling fancy.
- 2½ cups cake flour: Sifted, always sifted! It keeps the cake light as air. All-purpose flour works in a pinch, but cake flour is my secret weapon.
- 3 teaspoons baking powder: Fresh baking powder = fluffy cake. Check the expiry date!
- ½ teaspoon salt: Balances the sweetness—don’t skip it.
- 1 cup milk: Whole milk makes the cake extra tender, but any milk you have on hand will do.
For the Syrup
- 1½ cups sugar: This creates that glossy, sticky syrup that soaks into the cake.
- 1½ cups water: Just plain water—no need for anything fancy here.
- 2 teaspoons red food colour: Gives the syrup that pretty pink hue. You can adjust the amount or skip it altogether if you prefer.
For the Coating & Icing
- 2-3 cups desiccated coconut: The star of the show! Finely shredded coconut sticks best, but if you only have flakes, give them a quick blitz in the food processor.
- 1 cup icing sugar (sifted): Lumps are the enemy here—sifting makes the icing silky smooth.
- 1-2 tablespoons hot water: Just enough to turn the icing sugar into a thick, glue-like paste.
See? Nothing complicated. Now, let’s get baking!
Step-by-Step Instructions for Easy Snowballs
Alright, let’s dive in! These steps are foolproof—just follow along, and you’ll have a batch of dreamy Easy Snowballs in no time. I’ve included all my little tricks to make sure they turn out perfect.
Prep the Cake Batter
- Preheat your oven to 180°C (350°F). Grease a 9×13-inch baking tray or line it with parchment paper—trust me, you’ll thank me later when the cake slides right out.
- Beat the eggs and sugar in a large bowl until they’re light, fluffy, and almost doubled in volume. This takes about 3-4 minutes with a hand mixer. You’ll know it’s ready when the mixture ribbons off the beaters.
- Add the vanilla and oil, mixing just until combined. Don’t overdo it—we’re keeping that airy texture!
- Sift the dry ingredients (flour, baking powder, salt) right into the bowl. Alternate adding the dry mix and the milk, starting and ending with the flour. Fold gently with a spatula—no vigorous stirring here. A few lumps are fine; overmixing makes the cake tough.
Bake to Perfection
- Pour the batter into your prepared tray, smoothing the top with the back of a spoon. Tap the tray lightly on the counter to pop any air bubbles.
- Bake for 25-30 minutes, or until a toothpick inserted in the center comes out clean. The top should be golden and spring back when lightly touched. If it jiggles, give it another 2-3 minutes.
- Let the cake cool in the tray for 10 minutes, then transfer to a wire rack. It needs to be completely cool before cutting—warm cake crumbles too easily.
Make the Syrup
- Combine sugar, water, and food coloring in a small saucepan. Stir over medium heat until the sugar dissolves completely—no gritty bits!
- Bring to a gentle boil, then simmer for 5 minutes. The syrup should coat the back of a spoon but still be pourable. Too thick? Add a splash of water. Too thin? Boil another minute.
- Let it cool slightly—you want it warm, not scalding, for dipping.
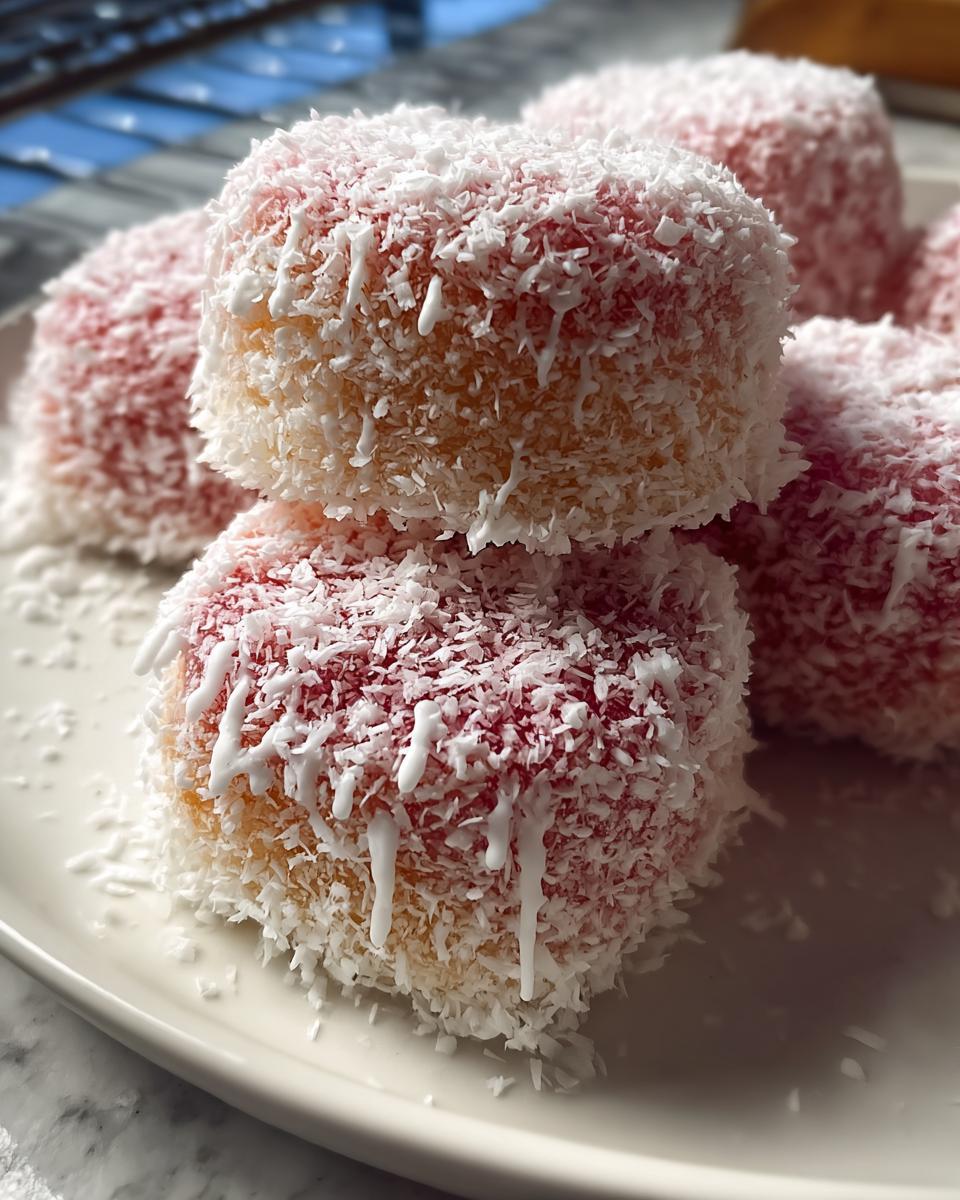
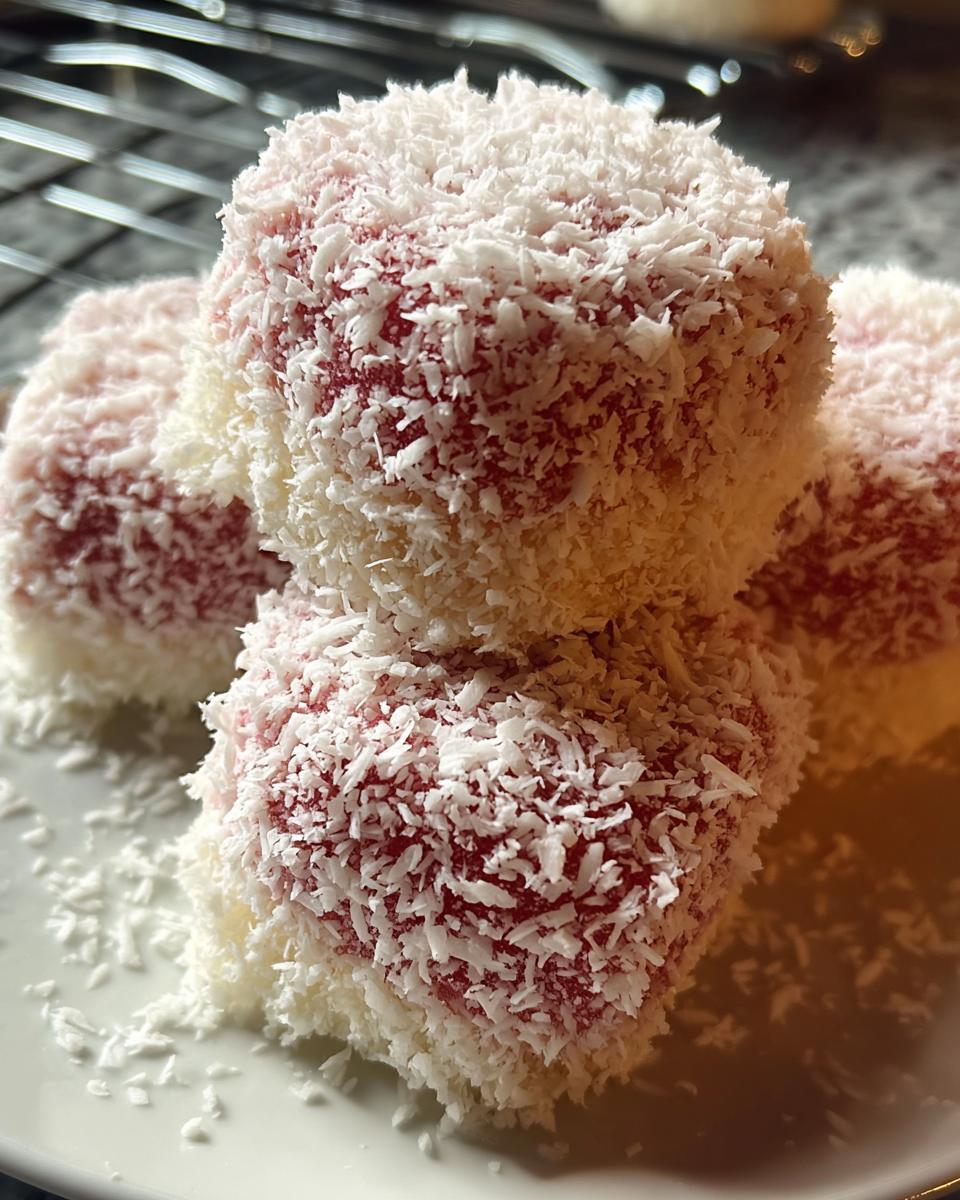
Assemble and Coat
- Cut the cake into 1½-inch squares. Pro tip: Use a serrated knife and saw gently—no squishing!
- Dip each piece into the warm syrup, letting it soak for a few seconds. Shake off excess—you want moist, not soggy.
- Roll in coconut, pressing lightly so it sticks. If the coconut won’t cling, your syrup might be too cool. Warm it up a touch!
- For double-decker snowballs, mix the icing sugar with hot water to make a thick paste. Dab a bit between two cake pieces and press gently. Let them set for 10 minutes before serving.
And there you have it—Easy Snowballs that look like you spent hours, but secretly took no effort at all. Now, try not to eat them all in one sitting (no promises, though).
Easy Snowballs Variations
One of the best things about Easy Snowballs? They’re like a blank canvas—you can tweak them to suit your taste or dietary needs without missing out on the magic. Here are some of my favorite spins on the classic!
Allergy-Friendly Tweaks
- Gluten-free: Swap the cake flour for a 1:1 gluten-free blend. I’ve had great results with Bob’s Red Mill—just add ½ teaspoon xanthan gum if your mix doesn’t include it.
- Dairy-free: Use almond or oat milk instead of regular milk, and coconut oil works beautifully in place of vegetable oil.
- Egg-free: Try a flax egg (1 tbsp ground flax + 3 tbsp water per egg) or applesauce for binding. The texture will be denser but still delicious.
Flavor Twists
- Citrus zing: Add a tablespoon of lemon or orange zest to the cake batter. For the syrup, swap ½ cup water with fresh juice—it’s like sunshine in every bite!
- Spiced warmth: Stir a teaspoon of cinnamon or cardamom into the dry ingredients. For the syrup, steep a chai tea bag in the hot water before mixing with sugar.
- Tropical vibes: Mix a tablespoon of coconut extract into the batter and use toasted coconut for rolling—double the coconut, double the fun.
- Natural color: Skip the food dye and use beet juice or pomegranate juice for a pretty pink syrup. Just strain it first to avoid bits.
See? Endless possibilities. The only rule? Have fun with it—your kitchen, your rules!
Serving and Storage Tips for Easy Snowballs
Now that you’ve made these adorable Easy Snowballs, let’s talk about the best ways to enjoy them—and how to keep them tasting fresh for days (if they last that long!). A few simple tricks make all the difference.
How to Keep Them Fresh
These little guys are best enjoyed within 2-3 days, but here’s how to keep them at their peak:
- Airtight is key: Store them in a container with a tight-fitting lid. A single layer works best—if stacking, separate with parchment paper to prevent sticking.
- Room temp magic: They’ll stay soft and moist at room temperature for up to 3 days. Just keep them away from direct sunlight (and sneaky snackers).
- Fridge option: If your kitchen is warm or humid, pop them in the fridge for up to 5 days. Let them sit at room temp for 10 minutes before serving—the coconut coating tastes better when it’s not ice-cold.
Freezing for Later
Yes, you can freeze Easy Snowballs! They’re perfect for gifting or stashing for a sweet emergency. Here’s how:
- Pre-freeze: Arrange the snowballs on a baking sheet in a single layer and freeze for 1 hour. This prevents them from clumping together later.
- Wrap it up: Transfer to a freezer-safe bag or container, squeezing out excess air. They’ll keep for up to 2 months—label the date so you don’t forget!
- Thawing: Let them defrost in the fridge overnight or at room temp for an hour. If the coconut looks dull, a quick roll in fresh coconut revives them perfectly.
Pro tip: Serve these with a cup of hot tea or coffee—the syrup soaks into the cake even more beautifully when it’s slightly warmed. And if you’re feeling fancy, dust them with a little extra icing sugar for a “fresh snow” effect. Happy snacking!
Helpful Notes for Perfect Easy Snowballs
Over the years, I’ve picked up a few tricks to make sure these Easy Snowballs turn out just right every time. Trust me, these little details make all the difference between “good” and “oh-my-goodness-I-need-another-one” good.
Don’t Skip the Sifting
I know, sifting flour feels like an extra step, but hear me out: it’s the secret to that cloud-like texture. Lumpy flour = dense cake, and nobody wants that. I use a fine-mesh sieve and give it a good tap—it takes 30 seconds, and your batter will be smoother and lighter. Pro tip: Sift your icing sugar too, unless you enjoy chasing lumps with a fork!
Syrup Consistency Matters
The syrup is what makes these snowballs magical, but getting it just right can be tricky. Aim for the thickness of warm honey—if it’s too thin, it’ll make the cake soggy; too thick, and it won’t soak in. My test? Dip a spoon in the syrup and run your finger down the back. If the line holds, it’s perfect. And keep it warm while dipping—cold syrup just slides right off.
- Room temp eggs blend better: Cold eggs can make your batter grainy. No time to wait? Submerge them in warm water for 5 minutes.
- Coconut freshness counts: Stale coconut tastes like cardboard. Give it a sniff—it should smell sweet, not musty. Toasting half the coconut adds amazing flavor too!
- Cut clean squares: A serrated knife saws through the cake without squishing the edges. Wipe the blade between cuts for neat little cubes.
One last thing: don’t stress if your first few snowballs look messy. Mine always do! By the third or fourth one, you’ll find your rhythm—and honestly, even the “ugly” ones taste incredible.
Frequently Asked Questions About Easy Snowballs
Over the years, I’ve gotten so many questions about these little treats—so here are the answers to the ones I hear most often! If you’ve got a question I didn’t cover, just shout in the comments, and I’ll help you out.
Can I make these ahead?
Absolutely! The cake itself can be baked a day in advance—just wrap it tightly in plastic wrap once cooled and store at room temp. Assemble the snowballs the next day so the coconut stays fresh and fluffy. The syrup can also be made ahead and reheated gently before dipping.
What if my syrup is too thin?
No panic! If your syrup isn’t sticking to the cake, pour it back into the saucepan and simmer for another 2-3 minutes to thicken. Too thick? Add a tablespoon of hot water and stir. Remember, it should coat the back of a spoon but still drip slowly.
Can I use shredded coconut instead of desiccated?
You can, but the texture will be different—shredded coconut is chunkier and doesn’t stick as evenly. If it’s all you have, pulse it in a food processor for a few seconds to break it down. Or, toast it lightly first for extra crunch!
How long do they last?
At room temp, they’re best within 3 days (if they last that long!). In the fridge, they’ll keep for up to 5 days. Just let them come to room temp before serving—cold coconut isn’t as tasty. And yes, they freeze beautifully for up to 2 months!
Why did my cake sink in the middle?
Usually, this means the cake wasn’t quite done baking or the oven temp was off. Next time, test with a toothpick—if it comes out clean, you’re golden. And resist opening the oven door too early—that rush of cold air can cause sinking. But hey, sunken cake still tastes amazing dipped in syrup!
Final Thoughts
There you have it—my go-to recipe for Easy Snowballs, the kind of treat that never fails to bring smiles. Whether you’re making them for a special occasion or just because, they’re a little reminder that the best things in life are often the simplest. That first bite of syrup-soaked cake, the crunch of coconut, the way they disappear from the plate in minutes—pure magic.
I’d love to hear how yours turn out! Did you add a twist? Maybe a sprinkle of cinnamon or a dash of citrus? Tag me on social or drop a comment below—nothing makes me happier than seeing your kitchen adventures. And if this recipe becomes a staple in your home like it is in mine, well, my work here is done.
Happy baking, friends. May your snowballs be sweet, your syrup sticky, and your coconut plentiful. Now go enjoy every bite—you’ve earned it!
Print
Easy Snowballs – A Delicious Family Favorite Recipe
- Total Time: 50 mins
- Yield: 20–24 snowballs 1x
- Diet: Vegetarian
Description
Easy Snowballs are soft, sweet treats coated in coconut and filled with a light syrup. Perfect for any occasion.
Ingredients
- 4 large eggs
- 1½ cups sugar
- 1 tablespoon vanilla essence
- 1 cup oil
- 2½ cups cake flour
- 3 teaspoons baking powder
- ½ teaspoon salt
- 1 cup milk
Syrup Ingredients:
- 1½ cups sugar
- 1½ cups water
- 2 teaspoons red food colour
- 2–3 cups desiccated coconut
Icing for Joining:
- 1 cup icing sugar (sifted)
- 1–2 tablespoons hot water
Instructions
- Preheat oven to 180°C (350°F).
- Beat eggs and sugar until light and fluffy.
- Add vanilla essence and oil. Mix well.
- Sift flour, baking powder, and salt. Add to the mixture alternately with milk.
- Pour batter into a greased baking tray. Bake for 25-30 minutes or until a toothpick comes out clean.
- For the syrup, combine sugar, water, and food colour in a saucepan. Boil until sugar dissolves.
- Cut the baked cake into small squares. Dip each piece into the syrup, then roll in desiccated coconut.
- Mix icing sugar with hot water to make a thick paste. Use to join two cake pieces if desired.
- Let them set before serving.
Notes
- Store in an airtight container to keep them fresh.
- Adjust food colour to your preference.
- Ensure syrup is warm when dipping the cake pieces.
- Prep Time: 20 mins
- Cook Time: 30 mins
- Category: Dessert
- Method: Baking
- Cuisine: International
Nutrition
- Serving Size: 1 snowball
- Calories: 180
- Sugar: 20g
- Sodium: 50mg
- Fat: 8g
- Saturated Fat: 2g
- Unsaturated Fat: 5g
- Trans Fat: 0g
- Carbohydrates: 25g
- Fiber: 1g
- Protein: 2g
- Cholesterol: 35mg
Keywords: easy snowballs, coconut dessert, sweet treats
